
Every so often I try to get rid of things I do not need by selling them on eBay or Craigslist. I found pretty quickly that better product photos help listings look more trustworthy, close faster, and usually sell at higher prices. The problem is most lighting most people have on hand, built-in flash, ceiling lights, a desk lamp, looks pretty bad on small objects.
So I built this cheap tabletop light box from foam board, poster board, and a few simple supplies. Most of the materials came out of my recycling pile and a trip to Staples. The whole thing cost me almost nothing and the results are noticeably better than any bare-bulb setup even with the same lights.
The build itself is simple, but what makes it actually work is understanding what is happening to the light. Once that clicks, you can get good results fast with almost any light source you already own. If you have never heard the term before, a light box or light tent is just a small enclosed setup that softens light and gives you cleaner product photos.
Want better product photos without buying expensive gear? This $20 DIY light box takes 15 minutes to build and dramatically improves lighting for eBay, Etsy, and small items.
- ✔ Cleaner white backgrounds
- ✔ Softer shadows
- ✔ Better photos with your phone
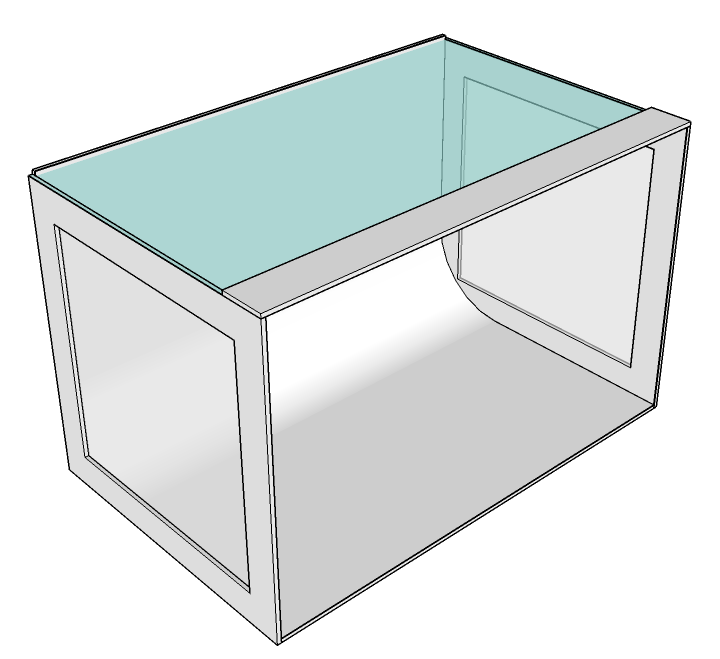
- Tabletop light box built from foam board or cardboard, roughly 14" deep by 22" wide
- Diffused side and top panels make any light source look softer and larger
- White poster board background clips in with binder clips, easy to swap or replace
- Removable foam board reflectors bounce light into shadow areas
- No power tools required, a utility knife and scissors are all you need to build it
What Is a Light Box (And Why It Makes Your Photos Look Better)
A light box (also called a light tent) is a simple setup that surrounds your product with soft, even light. It reduces harsh shadows and makes colors look more accurate.
If you’ve ever taken a photo of something on your table and it looked dark, yellow, or uneven — this fixes that.
Why a light box gives you better product photos
A tabletop light box, sometimes called a light tent, is a way of making ugly light behave better. The problem with most available lighting is that the source is small and harsh. Small harsh light creates hard shadows, hot spots, and reflections that call attention to the setup instead of the subject.
To understand why, you need to know a little about how shadows work. Every shadow has three zones: the umbra, the penumbra, and the antumbra. The umbra is the darkest part, where the light source is completely blocked. The penumbra and antumbra are the softer transition zones where some light still gets around the edges of the object.
When the light source is small relative to the subject, the umbra dominates. That is what gives you the hard stamped-on shadow you see in most bare-flash listing photos.

When the light source is large relative to the subject, the umbra shrinks and the softer transition area takes over. That is what gives professional product shots their clean gradual falloff.

The light box works by turning whatever light you have into a large soft panel through diffusion. The white interior walls and reflectors then bounce light back into the shadow areas, keeping the whole subject lit more evenly. Here is a real example: one light on the left side of the finished box.

For comparison, the same knife on the same background under two setups most people would try first.


The difference is not subtle, and you get there with foam board and whatever lights you already own. If you sell small items online, this is one of the easiest ways to make listing photos look cleaner without buying a full studio kit.
What you will need
Everything here is available at a craft store or hardware store. If you already have cardboard, lights, and a few other items on hand, the only thing you may need to buy is poster board.
Materials & Tools
Disclosure: This post contains affiliate links. If you purchase through a link on this site I may earn a small commission at no extra cost to you. As an Amazon Associate I earn from qualifying purchases.
Materials
Also Needed
- Pencil
- Tape measure
For lighting you will need at least one lamp or flash. A clamp-on reflector work light from the hardware store is the most effective option. See the lighting section below for more detail.
Cut plan
The dimensions below are based on 22" x 28" foam board. If you are using cardboard, cut the same basic shapes from whatever you have. Sizing is not critical except for the 22" width and the 14" depth. I eyeballed a fair amount of this and it worked fine.

Build steps
Step 1: Back and bottom
Take one sheet of 22" x 28" foam core and score it across the middle at 14" so it bends cleanly to a 90-degree angle. If you are using cardboard, cut two 14" x 22" pieces and tape them together along the 22" edge to form an L.

Step 2: Cut the sides
Cut two side panels at 14" x 14-3/16". The extra 3/16" accounts for the foam core thickness. In a perfect world they would be 14-3/16" square, but the difference is small enough that it is not worth buying extra material over.
After cutting both sides, mark a rectangle about 1-1/2" in from all four edges and cut out the center. Save those inner pieces. They become reflectors in Step 7.

Step 3: Apply diffusion material to the sides
Glue the diffusion material to the inside face of each side panel so it covers the opening completely. I used two layers of white tall kitchen garbage bags and it worked well. If you are using ripstop nylon, one layer is enough. The key is that the material is uniformly white and evenly semi-translucent with no texture, print, or color of its own.

Step 4: Attach the sides and top support
Cut a strip of foam core or cardboard about 2" wide and 22" long, plus a little extra on each end for the thickness of the side panels. Tape the sides into place with the diffusion material facing inward, then tape the top support strip across the top of the back panel.

Step 5: Insert the poster board background
Slide a 22" x 28" sheet of white poster board into the box with the shiny side facing up. Let it form a soft natural curve where the back meets the floor. That curve is what gives you the seamless infinity background look. Clip it to the back with binder clips so it stays in place and is easy to swap out when it gets dirty or if you want to try a different color.

The front edge will hang a little outside the box. That is fine.
Step 6: Add the top diffuser
Cut another piece of diffusion material for the top opening and clip it in place. Make sure it tucks under the top support strip, especially if your frame is made from brown cardboard. You do not want a dark strip visible through the top of the frame in your shots.
Step 7: Make the reflectors
The inner cutouts from the side panels make good reflectors. Their job is to bounce some light back toward the front of the subject and lift the shadow areas a bit. If you are using cardboard, cover one face of each piece with a strip of white poster board so the reflective surface is clean white.
To make them stand upright on their own, cut four small feet about 2" tall from the leftover foam core and notch each one so the reflector panel slides in. The fit does not need to be precise. I eyeballed all of mine.


Lighting and setup tips
The light box makes almost any light source look better, but a few things will get you there faster.
You can use one light on one side, one on each side, one or two from the top, or some combination. Keep the light about 8 to 12 inches away from the diffuser so it has room to spread before it hits the material. Too close and you get a visible hot spot right where the beam enters.
A fixture with a large reflector is the most effective option. A basic clamp-on reflector work light from the hardware store works well and costs almost nothing. Desk lamps, camera flashes, or whatever you have on hand all work fine too.
For bulbs, use the same type across all your fixtures or you will spend your whole session fighting color casts. A daylight-balanced bulb around 5000K is a good starting point. I have used Alzo Digital 5000K CFL bulbs for this, they are very bright and match flash output reasonably well.
For the sample shots below I used a single hot-shoe flash on an off-camera cord, which lets you move the flash around and try different positions without much hassle. A tripod is worth using if you are shooting with continuous lights since shutter speeds will be slower.
Sample photos
Here is the finished light tent in action with two flashes. One is connected to the camera with a cord, the other is triggered wirelessly.

Moving the lights and reflectors around is where it gets interesting. Small position changes make a big visual difference.

A few more test shots taken right after the build:


Troubleshooting
| Problem | Likely cause | Fix |
|---|---|---|
| Shadows still look harsh | Light is too close to the diffuser, or reflectors are not facing the shadow side of the subject | Pull the light back 4 to 6 more inches and reposition reflectors so they face the shadowed front of the subject |
| Background looks gray not white | Exposure is low, or not enough light is reaching the background | Add a stop of exposure and consider adding a second light aimed at the background from behind the subject |
| Strange color cast | Mixed bulb types or wrong white balance | Use the same type of bulb in every fixture and set a manual white balance if needed |
| Hot spot or glare on shiny objects | Light angle is hitting the reflective surface directly | Raise the light or move it farther to the side, and use a reflector rather than direct light on the opposite side |
| Background has a visible corner crease | Poster board was stored folded or forced into a hard corner | Use a fresh sheet and let it curve naturally without forcing it |
Frequently asked questions
A light box, sometimes called a light tent, is a small enclosed setup with white sides and diffused light. It softens shadows, reduces glare, and makes it easier to get cleaner product photos on a simple background.
Not necessarily, but it is one of the easiest ways to improve listing photos at home. A light box gives you softer light, cleaner backgrounds, and more repeatable results without needing much space.
Foam board is cleaner and easier to cut precisely, but cardboard works fine. I actually built mine from cardboard because that is what I had in the middle of a recycling pile. The important things are a white interior surface, clean diffusion panels, and a smooth curved background. The structural material is secondary.
The inside needs to be big enough for the object to fit with some breathing room on all sides. The 22-inch width in this plan handles most small tools, hardware, collectibles, and the kind of items you would list on eBay or Craigslist. If you regularly photograph larger objects, just scale the dimensions up. The proportions stay the same.
Yes, continuous lights work great. You will want a tripod since shutter speeds will be slower. Daylight-balanced bulbs make post-processing easier, but even incandescent bulbs look significantly better coming through a diffuser than they do bare.
Not always. Getting clean even light is the real priority. A slightly warm or slightly gray background is easy to lift in post. What is hard to fix is uneven splotchy lighting, and that is exactly what the light box prevents.
If you want something that folds flat and ships in a box, buying one makes sense. If you like building things, already have the materials, or want a rigid setup you can tweak and customize, making your own is still a perfectly good use of an afternoon. The performance difference between a decent commercial tent and a well-built DIY version is minimal.
White ripstop nylon is the classic choice because it is durable, consistent, and stretches flat easily. That said, white kitchen garbage bags, tracing paper, white tissue paper, and parchment paper all work. Whatever you use needs to be uniformly white and evenly semi-translucent with no visible texture or print showing through.
Comments (6)
Join the Discussion (6)