Should Your Thermostat Be Cloud Connected?

Should Your Thermostat Be Cloud Connected?

The idea of a wi-fi enabled thermostat that you can control remotely through your smart phone or computer is very appealing. Unfortunately most of the wi-fi thermostats I've run across have one major flaw. They require the use of an internet or cloud based system for remote monitoring capabilities which leads to a lot of problems and concerns. I've had my Honeywell Wi-Fi Programmable Touchscreen Thermostat RTH8580WF installed for over a month now and here are my issues with not only the Honeywell thermostat but other similar thermostats that can only be used with a 3rd party web service.
Read More →
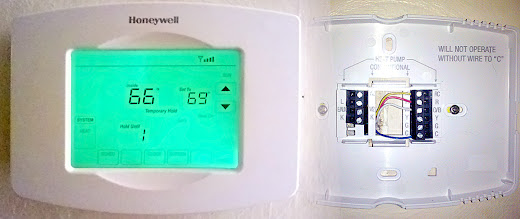
How To Add C Wire To Thermostat

How To Add C Wire To Thermostat

New Wi-Fi thermostats are available that allow you to remotely control the temperature in your home. Unlike other battery powered programmable thermostats, these new thermostats can't run on batteries alone and even if they can they will drain the battery quickly. It's therefor necessary to connect a "C" wire to these thermostats to provide power. This post details how I provided power to my thermostat that didn't have a C wire running to it by using a plug-in 24 volt AC transformer. With a C wire powering your thermostat you won't need to worry about the batteries dying and you can set the light on your thermostat to be always on to act as a nightlight.

The thermostat I was replacing only controls my gas fired, hot water boiler which provides heat only. I didn't have to worry about cooling as my AC unit runs off a separate thermostat. There were three wires coming out of the wall where my old thermostat was mounted. My heating system only requires two wires, R and W, to operate. I thought I could use the third wire to power my thermostat and use that as the C wire. Unfortunately I ran into a couple of problems.

First, there wiring was very old and there appeared to be a break in that third wire. I couldn't get current to flow to it from the basement.

Second, and probably most importantly, I called the manufacturer of my boiler to double check that it would be okay to connect the thermostat to the C terminal on the 24 volt AC transformer in the boiler. These types of thermostats are called "power stealing" thermostats and the manufacturer (Weil McLain) does not recommend using a power stealing thermostat with my boiler. They were worried that the additional load from the thermostat may cause the transformer to prematurely burn out. They recommend using a separate 24 vac transformer to power the thermostat.

The instructions for the Honeywell Wi-Fi Programmable Touchscreen Thermostat (RTH8580WF1007/U) I was installing didn't specify how to hook up an external power supply to the thermostat but calling customer service I was able to find out how to attach an external transformer. If your thermostat is also controlling your cooling system or you have a different type of heating system the configuration might be different. It's a good idea to call the manufacturer of your thermostat and get specific instructions for your model and HVAC unit.

Update: wi-fi on the thermostat sucks. You can only update the thermostat provided the thermostat can connect to the internet. Hurricane Sandy caused me to lose my home internet but I still had power and heat. When I went to bed the following night I was chilled do the bone having been outside most of the day dealing with the aftermath and i wanted to turn up the heat without getting out of bed but i couldn't because my internet was down. I could access all other wired and wireless devices on my network, just no internet access. There is no way to connect to the thermostat directly. It is all done through Honeywell's cloud service which it turns out collects my homes temperature readings and heating system information every 12 seconds. I don't like that and i don't like not being able to access the thermostat from home when my internet is down.

Change Your Thermostat Before It Gets Cold

With any project things can go wrong. You don't want to be in a position where it's the coldest part of winter and you're without heat for whatever reason!

Also check with your HVAC system manufacturer and thermostat manufacturer for specifics about your installation. Check with all applicable local building codes. 

If snaking wire through walls and making electrical connections is not something you're comfortable with call an electrician.

What You'll Need

Materials

  • New Thermostat (I used a Honeywell RTH8580WF)
  • 24 Volt AC plug-in transformer (I used an MGT-2440)
  • 18 gauge thermostat wire. Number of conductors should be at least the amount of wires coming up from your HVAC system + 2 for the transformer. I needed a total of 4 conductors so I purchased the  Southwire 50 ft. 18/2-Gauge Thermostat Wire 64162179. You may need more or less depending on how far you have to run the wire.
  • 4 Wire nuts (one for each conductor you'll be using). Small ones, yellow or orange should do it.
  • Fire Block Sealant
  • Electrical tape.

Tools

Step 1: Plan Your Wiring

I could have continued to use the 2 thermostat wires that were in my wall plus add 2 more wires that will run outside the wall to a nearby outlet where I would plug in the 24vac transformer. I didn't like this setup because I didn't want the wire to the transformer exposed where the thermostat was mounted. The installation would look much cleaner if all the wiring ran through the wall as it did previously.

I needed 4 conductors. Two from the boiler and 2 from the 24vac transformer. The closest wire I could find was 5 conductor thermostat wire which is what I used. I was going to run the 5 conductor wire from my thermostat down to my basement and then I'd splice 2 more cables in the basement. One set of 2 conductors going to the boiler and two more going to the transformer which will be plugged into a wall. I used the same 5 conductor wire throughout (except for the connection between the boiler and new wire where I used the existing 3 conductor wire).


There is no standard color coding for thermostat wiring. I decided to use the following convention. R - Red, W - White, Rc - Yellow, C - Blue. The yellow and blue wires will go to the transformer and since it's an AC transformer they could be switched.

The 5 conductor wire will be snaked down the wall into my basement. From there I'll separate it into two runs. The Red and White will connect to an existing wire in my basement that goes into my boiler and connects to the R and W terminals on my boiler. The Yellow and Blue wires will run along another wire that goes to the plug-in 24vac transformer that will be plugged into a nearby outlet in the basement.

Step 2: Turn Off Your HVAC System

Before doing anything turn off the power to your HVAC system. This will vary by system but there should be some sort of switch near your system or there might be a breaker specifically labeled in your main circuit breaker panel.

Step 3: Remove Old Thermostat

Your new thermostat will come with instructions and wire labels. Follow the instructions to label your existing wires with the stickers so you know which wire is which. 

After you label your wires but before you completely disconnect them from the old thermostat, wrap a pencil around the existing wires and/or tape the wires to the wall the prevent them from slipping down into the hole.

If you need to drill holes for new wall anchors to screw in your new thermostat, do that now. Luckily I was replacing a different Honeywell Programmable thermostat that used the same hole spacing.

Step 4: Run New Thermostat Wire

This is the tricky part and how you run your wire is going to depend on how your existing wire is run. I was lucky and my thermostat had a straight run down the wall it was installed on down to my basement. By pulling on the wire from upstairs and down in the basement I was able to tell that the wire was not firmly stapled to the wall and I'd be able to pull it right out. The types of fasteners I saw used in the basement were fairly loose fitting. If that's not the case for you you might have a harder time snaking the new wire. You might have to make small holes in your walls here or there. Fishing wire can be tricky and you might want to hire an electrician to do this for you. Remember, it's best not to try and tackle this when it's very cold and you don't want to be without heat for a couple of days if something goes wrong.

Prepare Fish Tape

The first time I ever used the GB Fish Tape it was very difficult to get it out of the reel. You're supposed to pull the steel tape out by hand. It's coated in oil which makes it tricky. I took the tape outdoors, don't do this on carpet or the oil will stain it, and pulled out as much of the tape as I could by hand. Then I stepped on the end and pulled on the reel slowly working all the tape out. As my reach wasn't sufficient I walked down the tape to change where I was putting pressure. Be careful not to severely bend the steel tape when doing this. One I got all the tape out I reeled it in and repeated the processes. Now whenever I use the fish tape it comes out effortlessly.

Attach Wire to Fish Tape

From upstairs, where the old wire was coming out of the hole in the wall I attached the wire to the end of the fish tape. There's a small hole in the end that I passed the wires through and then used electrical tape to secure everything together. Make sure that the tape is put on neatly so that the point of connection isn't significantly thicker than the thickness of the wire. Tug on it a few times to make sure the wire isn't going to come off of the fish tape while you're pulling it through the wall.

Make sure you have enough fish tape unreeled to reach down to the other end of the opening.

Pull Wire Down

Next I went down to my basement where the old thermostat wire was coming out of the floor boards. I carefully pulled down on the old wire until the fish tape came down to a working level. I had to run up once to feed in the fish tape when it seemed to get a big snagged. This operation is easier if you have one person guiding the tape down from above and another pulling from below but is doable with one person.

Attach New Wire To Fish Tape

First I unspooled a sufficient length of wire and straightened it out a bit. I made sure to unspool enough wire that when I pulled the end upstairs the spool will still be on the ground so that the weight of the spool wouldn't pull the wire back down.

I stripped off about 1.5" of the brown outer wire wrap exposing the 5 individual colored wires. I passed those wires through the holes in the end of the fish tape. Then I took 3 of the individual strands one by one and wrapped them around the tip of the fish tape. Two in one direction and the other in the other direction. This will help secure the wires on the tape. Finally I securely wrapped the connection using electrical tape and tugged on it a few times to make sure it wouldn't come apart while pulling the wire through the wall.

I had taken a picture before I wrapped the connection with electrical tape to show you how I fastened the wire to the end of the tape. Unfortunately I didn't realize the photo didn't come out when I took it. The description above will hopefully be sufficient. Any way you attach it it's important that it provides some security and doesn't add much to the width.

Pull New Wire Up Through Wall

The first step is to start feeding the wire up from below until the connection between the fish tape and thermostat wire is past the hole. This is one of the points where the wire might snag. It's easier to do this with two people but I managed on my own.

Once the connection was through I double checked that the wire was straight and that there was enough unspooled. 

Then I went upstairs and carefully pulled the fish tape up until the new wire came out of the hole in the wall.  


I made sure I had enough wire to work with and I wrapped some tape around the new wire, while keeping the tape on the spool, to prevent the wire from slipping back down the hole. You could also wrap the wires around something like a pencil.

Step 5: Connect Wires to Thermostat Base Plate

With the new wire fished through the wall it was time to start wiring up the new thermostat. I trimmed the wire to an appropriate length so about 4 inches was sticking out of the wall. I'd deal with the mess of unwrapping the electrical tape off the end and fish tape later. I began by stripping a couple of inches of the brown outer wire sheath to expose the 5 individual color coded wires within. Then I wrapped the Green wire back against the main wire bundle since I wasn't going to be using it then I stripped about 3/8" off the end of the 4 remaining wires as shown.

Remove Jumper

The base plate of the thermostat comes with a metal jumper connected between Rc and R, it looks like a small staple. This jumper needs to be removed to be able to wire the thermostat to an independent power transformer. To remove it, use the small flat-headed precision screwdriver to loosen the two screws for Rc and R in the black terminal block. You don't need to unscrew them all the way, just until the tops of the screws are flush with the top of the black terminal block. Once both screws are loosened just pull the jumper out.

The Rc terminal is used for connecting the cooling relay. If your thermostat controls both your heating and cooling system I'm not sure how you'd go about wiring an external transformer. In that case you'd likely need to wire your thermostat's C wire directly to the transformer on your 24 volt HVAC system. 

Attach Wires

One by one feed the end of each wire into it's appropriate terminal block and screw it down to hold it in place. The convention I'm using is:
  • R - Red (to boiler)
  • W - White (to boiler)
  • Rc - Yellow (to transformer)
  • C - Blue (to transformer)
Once the wires are attached you can secure the base plate to the wall. I used a small level on the side to make sure the base was mounted straight. (The top of the thermostat and base plate are curved.) The picture, didn't come out quite as straight :) but you can see how the 4 wires attach to the thermostat's base plate.


Depending on your HVAC system your wiring might be different.

Step 6: Connect Thermostat To Transformer

Back down in the basement and I ran the new wire to where the connection point to the wiring that goes to the furnace is. I think when they installed my new boiler they spliced in a new thermostat wire into the old one and the connection point is on a wall above the boiler. I ran the new wire to that point, gave my self a little extra to work with in case there where any mistakes and I cut the wire and stapled it securely to the wall. 

I then stripped off about 2" of the brown outer wire sheath. As before I wrapped the green wire back around the main wire since I wasn't going to be using it. Then I stripped off about 3/4" from the ends of the 4 remaining wires.

Next I determined where I was going to plug the 24 vac transformer in and measured out the appropriate length of wire from the spool. I knew I was going to have extra thermostat wire left over and I will be using that instead of getting a different 2 conductor wire since I won't need all 5 for this run.

After trimming the wire to length, I stripped off the ends of the wires and, wrapped the each around one of the 2 screw terminals on the transformer and tightened them down. The position of these two wires isn't important as this is an AC transformer. I picked this particular 24vac transformer (MGT2440) because it had the screw terminals.

Next I attached the yellow wire coming from the transformer to the yellow wire running down from the thermostat. I stripped the ends of both about 3/4", used pliers to wrap the wires around each other in a clockwise direction and secured them with an orange wire nut. I repeated the process for the blue wire from the transformer to the thermostat wire.

Before going any further I wanted to make sure the thermostat was getting power so I plugged the transformer in, ran upstairs, pushed the thermostat onto it's base and was happy to see the screen on :)


I had already configured to wireless settings when I was testing the 24vac transformer before I went through all this trouble.

Step 7: Connect Thermostat to Boiler

There was a 3 conductor wire running from the boiler to the old wiring for the thermostat. Luckily this new wiring was color coded so I knew which colors went to the R and W terminals on the boiler. One by one I attached the Red wire from the new wire that I ran from the thermostat to the basement by stripping off 3/4" off the new wire and wrapping it around the wire running to the thermostat R terminal in the boiler. The boiler wire was previously connected to the old wire and already stripped. I capped the connection with a wire nut and repeated the process for the White wire to the wire that runs to the W terminal on the boiler.

I flipped the switch to turn the power to the boiler back on and ran upstairs to make sure everything was working. I turned up the thermostat and checked to make sure the boiler fired up. While downstairs next to the boiler I used my phone to turn the thermostat down and within a few seconds the boiler turned off. :)

Step 8: Wrap Things Up

Now that I know everything is working correctly I wrapped electrical tape around the wire nuts to help keep them secure and I used the Fire Block Caulking in the opening from the basement up to the wall where the new thermostat wire runs. To be on the safe side I double checked that everything was working. Using the app on my phone I can adjust the thermostat from anywhere.

One of the nice things about having the thermostat plugged into the wall is that the light on the thermostat can always stay on and I don't have to worry about batteries draining. The thermostat is next to an opening I tend to bump into when I go down to grab a glass of water in the middle of the night. Hopefully no more stubbed toes and I never have to worry about replacing the batteries.
Read More →
How To Cut Plywood With A Circular Saw

How To Cut Plywood With A Circular Saw

Getting accurate, straight cuts on full sheets of plywood or MDF can be an expensive proposition. The best way to do it is with a good, heavy table saw. If you're limited on space you can also use a plunge cut track saw like the Dewalt or Festool but those aren't cheap either. A cheaper option is something like the Kreg Rip-Cut Circular Saw Guide but it is limited to only 24" cuts. If you already own a circular saw this simple to make zero-clearance circular saw guide will help you make accurate rip and cross cuts in full 4' x 8' sheets of plywood.

Since this circular saw cutting jig gets placed up against the cut line, it makes it much faster than other cutting guides that require you to offset the guide some distance from the line. The design also helps prevent splintering and tear out of the thin plywood veneer. Also see my new post for tips on cutting plywood square with a circular saw and my plywood cutting table plans that can be used with this plywood cutting jig.
Read More →
Plywood Open Nightstand

Plywood Open Nightstand

Free woodworking plans to build simple nightstands out of plywood. Features a drawer and open shelving. You can build 2 nightstands out of 1 sheet of 4' x 8' plywood plus 3 quarter sheets for the drawer and back.

This is a relatively easy piece of bedroom furniture you can build with tools most DIY'ers have. Made from real plywood (since you choose your own wood) and not particle board like most furniture seems to be these days.

Dimensions

Dimensions: 22-1/2"W x 26"H x 19"


What You'll Need

Materials

The following material list will make 2 nightstands.
  • (1) 3/4" 4' x 8' sheet of plywood or 4 2' x 8' quarter sheets
  • (1) 1/2" 2' x 4' quarter sheet of plywood
  • (2) 1/4" 2' x 4' sheets of plywood
  • (86) 1-1/4" coarse thread Maxi-Loc pocket hole screws
  • (6) 1-1/4" tapered head wood screws
  • (4) 1" round head wood screws
  • (2) pairs of drawer slides
  • (28) feet of 3/4" veneer edgebanding
  • Staples, brads or 3/4" wood screws to attach the back
  • Wood glue
  • Assorted sandpaper
  • Stain/finish or primer paint

Tools

  • Drill and assorted bits
  • Circular saw with guide, track saw or table saw
  • Kreg Jig
  • Iron (for edgebanding)
  • Measuring tape
  • Pencil
  • Screwdriver
  • Utility knife
  • Sanding block or finish sander
  • Painting/staining supplies
Make sure you understand how to use all the tools properly and follow all safety precautions.

Cut List

  • (4) 25-1/4" x 17-1/4" 3/4" Plywood Sides
  • (2) 22-1/2" x 19" 3/4" Plywood Tops
  • (2) 20" x 16-1/2" 3/4" Plywood Bottoms
  • (2) 20" x 4-1/2" 3/4" Plywood Bases
  • (2) 19-3/4" x 6" 3/4" Plywood Drawer Fronts
  • (6) 20" x ~4" 3/4" Plywood Stretchers
  • (4) 14-3/4" x 5" 1/2" Plywood Drawer Box Sides
  • (4) 17-1/2" x 5" 1/2" Plywood Drawer Box Front/Backs
  • (2) 25-1/4" x 21-1/2" 1/4" Plywood Backs
  • (2) 18" x 14-1/4" 1/4" Plywood Drawer Bottoms

Cut Plan

3/4" Plywood

The main elements of the nightstand are made out of 3/4" plywood. You'll need 2 quarter sheets per nightstand or 1 full sheet to make two nightstands.

Note: Only one dimension given for stretchers. The length is the important measurement for the stretchers. You can make them any width that is easiest for you as long as they're at least 3" wide. Since I don't have a tablesaw to cut my plywood with, I usually cut the stretchers longer than necessary with my circular saw and guide and cut them to finished length with my miter saw once I'm ready to attach them after measuring the working cabinet.

Full Sheet

Quarter Sheets

The cut plan below is for one nightstand. If you're making two you'll need to duplicate the cuts on the following 2 2' x 4' sheets for a total of 4 sheets. The formaldehyde freem PureBond 3/4 in. x 2 ft. x 4 ft. Cherry Plywood 1703 from Home Depot is a good choice and they're currently eligible for free shipping.


1/2" Plywood

You'll need one sheet of 1/2" plywood to make the drawer boxes for both nightstands. A good choice for the drawer boxes is PureBond 1/2 in. x 2 ft. x 4 ft. Maple Plywood.


1/4" Plywood

You'll need one quarter sheet of 1/4" plywood for the back and drawer bottom. Two if you're making two nightstands. Since part of the back will be seen through the open shelf it's important for the 1/4" plywood to match the species of the 3/4" plywood. You can use PureBond 1/4 in. x 2 ft. x 4 ft. Cherry Plywood.

Step 1

Apply veneer edgebanding to the top of the Base and drill pocket holes as shown.  Place the Bottom piece upside down on a flat work surface so you can attach the Base to it. Make sure the Base is also upside down so that the veneered edge is touching the work surface. Use wood glue and 1-1/4" coarse head screws to attach the Bottom to the Base through the pocket holes. Make sure the pieces line up and are square.

Step 2

Apply veneer edgebanding to the front edges of both Side pieces then attach one side at a time to the Base/Bottom piece from the previous step using 1-1/4" screws and glue. The bottom of the Side should be even with the bottom of the Base and the edge with the edgebanding should be on the same side as the base as well. Make sure everything goes together square.

Step 3

Make sure all three stretchers are the correct length to keep the nightstand square. Attach veneer edgebanding to one of the long edges of 2 of the stretchers. Drill 4 pocket holes in each stretcher.

Attach two of the three stretchers. One to the top front (with edgebanding out) and one on the back top (no edgebanding) as shown. 

Step 4

Attach the 1/4" plywood Back to the back of the nightstand. You can use staples, 5/8" - 3/4" brads or 3/4" wood screws. If you screw the back on make sure to drill pilot holes and countersink holes first to avoid splitting the plywood sides.

Step 5

Cut the Drawer Front so that it fits in between the 2 Sides and the top Stretcher with about a 1/8" gap all around after applying veneer edgebanding along each edge of the Drawer Front. Measure the height of the Drawer Front and add 1/4" to it. That's the distance you need to screw the remaining Stretcher from the top/front Stretcher. Apply veneer edgebanding to the front of it and drill 4 pocket holes on the side facing the top stretcher.

Step 6

Build the Drawer Boxes. The measurements assume side mounted drawer slides that require a 1/2" space between the drawer box and side of the nightstand. You'll need to cut a 1/4" rabbet on the bottom of all the drawer side pieces to accept the drawer bottom. The easiest way to do this is if you have a router table. If you don't use can use a circular saw set at 1/4" depth.


When you're done with the drawer box, attach the drawer slides to the sides of the cabinet and the drawer box according to the specifications of the slide.

Step 7

Wrap all four edges of the top with veneer edgebanding. Drill pocket holes on the top of the Sides and the back Stretcher to attach the Top to the nightstand from underneath using 1-1/4" pocket screws. Use 1-1/4 wood screws countersunk into the front Stretcher. The back and the sides should have a 1/2" overhang. The front should over hang 1".

Step 8

Insert the drawer box into the drawer slides and place a strip of double sided tape on the front of the drawer box. Position the drawer front on the drawer box leaving an even gap all around. Press the Drawer Front into the tape to temporarily hold it in place.  Carefully pull out the drawer by pulling on the drawer box from underneath and use 2 1" round head wood screws to attach the drawer box to the drawer front from inside the drawer box.  Once secured drill the holes for your drawer pull and install.

Step 9

Prepare your nightstands for finishing by filling in any holes with wood filler, sanding and then removing all sanding dust. Prime and paint or stain and polyurethane how you'd like.


Read More →
DIY Computer Desk from One Sheet of Plywood β€” Free Plans

DIY Computer Desk from One Sheet of Plywood — Free Plans

Finished plywood computer desk with integrated storage shelf and paper tray
  • Built from a single 4’ x 8’ sheet of 3/4" plywood with just 14 cuts
  • Includes integrated storage shelf, adjustable shelf, and paper tray
  • Finish with paint, stain, or a combination — the black and maple look is especially sharp
  • Pocket hole joinery throughout — no glue required, fully disassemble for finishing or moving

This attractive and functional computer desk is built using only one sheet of plywood and 14 cuts which makes it an easy and affordable desk that can be built with a few tools.

You can stain and finish it to reveal the natural wood grain, paint it any color you’d like or mix painting and staining as in the black and maple desk example shown below. The desk provides ample space for your computer and accessories as well as storage space for books, paper and other items you’ll want to have handy while working on your computer. All this from just a single sheet of plywood!

Read More →
Simple Contemporary Black Nightstand Plans

Simple Contemporary Black Nightstand Plans

Free DIY plans to build your own sleek, black, contemporary nightstand with three drawers to help keep your bedside clutter at bay. Features big, recessed, stainless steel lift handles for drawer pulls.

This black, closed nightstand has contemporary styling. Three large drawers provide storage for convenient items you'd like to have near your bed such as reading glasses, books, magazines as well as clothes storage for items that don't fit in your dresser. They make great sock and underwear drawers or storage for your pajamas and other sleepwear.

The recessed lift handles help to give it more of an industrial look. For the sailor the handles will bring back a feeling of being out cruising as they are typical of handles used on boats. You can choose to install one or two handles per drawer depending on the look you're after.

Dimensions

Dimensions: 20 1/2"W x 24"H x 17"D

What You'll Need

Materials

  • (2) 3/4" Plywood 2' x 4' (Carcass)
  • (1) 1/2" Plywood 2' x 4' (Drawer Boxes)
  • (1) 1/4" Plywood 2' x 4' (Drawer Bottoms)
  • (1') 2x2 Board
  • (1) 1x2 6' Board
  • (1) 1x3 8' Board
  • (1) 1x8 6' Board (Drawer Fronts)
  • (15') 3/4" Veneer Edgebanding
  • (3) Recessed Drawer Pulls
  • (3) Drawer Slides (pairs)
  • Assorted Sandpaper
  • Primer and Paint (or pre-stain, stain and finish coat)

Tools

  • Drill and assorted bits
  • Miter Box or Miter Saw
  • Circular saw with guide, track saw or table saw
  • Kreg Jig
  • Chisels
  • Hammer
  • Iron (for edgebanding)
  • Measuring tape
  • Pencil
  • Screwdriver
  • Utility knife
  • Sanding block or finish sander
  • Painting supplies
Make sure you understand how to use all the tools properly and follow all safety precautions.

Cut-List

  • (2) 15 5/8" x 22 1/4" Sides (3/4" Ply)
  • (1) 18 1/2" x 22 1/4" Back (3/4" Ply)
  • (1) 14 1/2" x 18 1/2" Bottom (3/4" Ply)
  • (1) 12" x 15 1/2" Top (3/4" Ply)
  • (4) 18 1/2" x 4" Stretchers (3/4" Ply)
  • (6) 4 1/2" x 17 5/8" Drawer Box Front/Back (1/2" Ply)
  • (6) 4 1/2" x 12" Drawer Box Sides (1/2" Ply)
  • (3) 12 3/8" x 17" Drawer Bottoms (1/4" Ply)
  • (4) 1" Feet (2x2)
  • (2) 17" Base Front/Back * (1x2)
  • (2) 13" Base Sides (1x2)
  • (2) 20 1/2" Top Edge Front/Back (1x3)
  • (2) 17" Top Edge Sides (1x3)
* Some drawer slides may require a different size drawer box. Check the specs for your slides to determine the width of the drawer box.

Cut Plan

Plywood

The plan calls for using 2' x 4' (quarter) sheets of plywood. If you plan on making 2 nightstands you can save a little bit of money by buying 1 full sheet of the 3/4" plywood. If you don't have an easy way to transport such a large sheet you might still want to go with 2' x 4' sheets because they're easier to transport. Home Depot has a few different species of 2' x 4' PureBond hardwood veneered plywood available on their website which are eligible for free shipping. Takes all the hassle out of buying plywood. Click the image on the right to explore their options in their lumber department. The PureBond plywood is made by Columbia Forest Products using Soy Based adhesives and is formaldehyde free.

Note on Edgebanding: Depending on the thickness of the edgebanding you use, you may need to cut some of the pieces a little smaller to accommodate. The kraft paper backed Edgemate edgebanding is only .022" (~ 3/128) thick which is too think to account for in a piece like this.

3/4" Plywood

Whether you're painting or staining your nightstand some of the grain texture will still show through so it's important to get plywood that has a nice grain structure such as red oak, maple, walnut, cherry, etc.

1/2" Plywood

A good choice for the drawer boxes is 1/2" maple plywood. HomeDepot.com offers PureBond 1/2 in. x 2 ft. x 4 ft. Maple Plywood at an affordable price which is currently eligible for free shipping.


If you don't have a table saw or router: it might be easier to make the rabbet cuts (discussed bellow in more detail) before you cut out the drawer box sides using a guide and a circular saw. That way the rabbets will line up perfectly on  at least 3 of the sides.

1/4" Plywood

The 1/4" Plywood is used for the drawer bottoms. Any 1/4" plywood (not MDF) will do such as PureBond 1/2 in. x 2 ft. x 4 ft. Maple Plywood.

Boards

All of the boards below should be of a wood that matches the species of the plywood you're using for the nightstand carcass. This is especially true if you're planing on staining the nightstand. It's a little less important if you're going to paint the cabinet, which is recommended for getting an even black finish, but still best to get the same species. 

2x2

You only need about 4" but get at least 12" so you have something to hold onto while making the cuts.  Actual dimensions will be 1 1/2" x 1 1/2". Board should be S4S (surfaced 4 sides). These will make up the legs of the nightstand. Use a stop-block on your miter saw to ensure all pieces are the same height. If you'd like to increase the size of your nightstand you can make these legs longer.

1x2

Actual dimensions are 3/4" x 1 1/2". This will be the apron around the base of the nightstand, between the legs.

1x3

These pieces will form the edge around the nightstand top to give it a nicer look. Actual dimensions are 3/4" x 2.5".

1x8

The 1x8's make up the drawer fronts. An appearance grade S4S board in a species that matches your 3/4" plywood. Actual dimensions will be 3/4" x 7.25".

Step 1

Begin by cutting out the 3/4" Plywood pieces for the Sides, Back, Bottom and Stretchers of the nightstand. The cut plan assumes the direction of the grain is running along the long end of the plywood boards. The plan calls for the grain on the sides to run up/down. The grain direction for the back and bottom aren't as important since they won't be seen. If the grain on your plywood runs in a different direction or you'd like to have the grain running in a different direction on your nightstand, make the appropriate changes to your cut plan.

It is important that the bottom piece is 3/4" shorter than the width of the sides (before applying edgebanding) so that the drawer fronts fit flush.

Step 2

Drill all pocket holes as shown and attach the veneer edgebanding to the front of the bottom piece. Attach the bottom piece to the back as shown using wood glue and 1-1/4" coarse thread pan head screws.

Step 3

Drill 1 or 2 pocket holes on the inside top middle of each side panel to attach the top later. Apply edgebanding to the front and back of the side pieces. Then screw the sides to the bottom and back using wood glue and 1-1/4" coarse thread Maxi-Loc head pocket hole screws in the holes previously drilled on the back and bottom.

Step 4

The 4 stretchers should be the same width as the back and bottom pieces to hold the cabinet carcass square.  Apply edgebanding to the front of 3 of the 4 stretchers that will be installed in the front of the nightstand. Recheck for square and attach the stretchers as shown using 1-1/4" coarse thread Maxi-Loc screws and wood glue.

Step 5

Temporarily attach the cabinet side half of the drawer glides to the cabinet following the specifications for the slides you purchased. You will need to remove and replace them when painting the cabinet but it's much easier to mark and align them before the top goes on.

Step 6

Cut and assemble the pieces for the top of the nightstand making sure it's square. The mitered 1x3's are cut to 2 different lengths. The top should be 1/2" wider and 1" deeper than the nightstand carcass. Use wood glue and 1-1/4" pocket hole screws.


Hint: It's best to cut the mitered boards after you cut the plywood and cut them a little longer than necessary. Cut them back after dry fitting them around the plywood top. It's important that the 2 pairs of boards are the same length to get a tight mitered corners. Cut one board, then cut just one side of the next board and stack the two together on top of your miter saw and use the first piece to help guide the cut.

Align the top with the nightstand. It should be flush with the back, overhang 1/4" on each side and 1" at the front. Secure the top with wood glue and 1-1/4" pocket hole screws from the sides of the cabinet and 1-1/4"  countersunk wood screws from the stretchers up into the top.

The Bosch Clic-Change 7-Piece Phillips Bit and Countersinking Set will drill the pilot holes and countersinks at the same time. The set doesn't come with the Clic-Change chuck but the bits will fit in a normal chuck. You just won't get the quick change feature. 

Step 7

Cut and assemble the base components so they will be flush with the bottom of the back and sides of the carcass. Use 1-1/4" fine thread Maxi-Loc head screws for the pocket holes and wood glue for the base. To attach the base to the cabinet use wood glue and pre-drill and countersink for 1-1/4" wood fine thread wood screws from the 1x2 pieces up into the carcass.

Step 8

Before cutting the pieces for the drawer boxes, measure the actual width or the nightstand opening and the actual width of your 1/2" plywood. The drawer slides need to be aligned well and the cabinet square for them to operate effectively. Make any corrections necessary when building your drawer boxes.

You will need to cut a 1/4" x 1/4" rabbet 1/2" up from the bottom of all the drawer box sides. If you have a router with a guide or router table or a table saw this is very easy but you can also cut the rabbet out with a circular saw set at only 1/4" deep and a cutting guide.. You might need to make 2 passes. Cut a test rabbit in some scrap wood to make sure you're not cutting too deep and make sure the 1/4" plywood edge will fit in the groove.

When using a circular saw I find it best to cut rabbets first, then cut out the 4.5" strips across the entire length of the plywood. Finally I trim the long strips to the right width using a miter saw.

Dry fit the drawer boxes to make sure they fit together right and square. Double check the measurements to make sure it will leave the required space on each side of for the drawer slides (usually 1/2").

Once you're ready, drill 4 pocket holes on the front and back pieces (opposite the side with the rabbet). Don't forge to adjust your Kreg Jig and drill bit for the 1/2" material. Glue and screw 3 of the sides using 1" coarse threaded screws. Slide the 1/4" drawer bottom into the groove but do not glue it. If the 1/4" plywood is slightly bowed (which happens frequently with this thin plywood) try to flatten it out and slide it in with the crown side up. Finally glue and screw the 4th piece to complete the drawer.


If you have a router give the top edges of the drawer a slight round over, otherwise use a file or sander to knock down the edges of the plywood a bit. Or you can cover them with 1/2" maple edgebanding.

Step 9

Attach the other halves of the drawer glides to the drawer boxes according to the drawer glide specs and make sure they work properly.

Step 10

Measure and cut the 1 x 8 board (should be 3/4" x 7 1/4" actual dimensions) for your drawer fronts. Cut them 1/4" shorter than the actual width of your cabinet opening so that there is a 1/8" gap between the sides of the cabinet and the drawer front on each side. Use shims to position the drawer fronts to make sure everything looks fine before continuing. 

Step 11

The lift handles used for drawer pulls need to be recessed into the drawer fronts. Measure and mark the positions on all three drawer fronts. Double check to make sure they all line up, then cut out the recess using either a router or a hammer and chisel.  Use a sharp utility knife to carefully score around the area that needs to be removed to help prevent chipping and splintering.

Step 12

Use double sided tape on the drawer fronts. Starting with the bottom drawer place the drawer front on the drawer box where you'd like it, using shims to get the spacing correct, then press it against the tape to temporarily hold it in place. Repeat for the remaining drawers. Carefully slide the shims between the top and middle drawer out and slide out the top drawer. Drive 4 1" round head wood screws from the inside of the drawer box into the back of the drawer front at the corners to secure it in place. Repeat for the remaining drawer fronts.

Finishing

You can leave the drawer boxes unfinished but 2 coats of a water based finish such as Minwax Water-Based Wipe-On Poly will help seal and protect them.

For the rest of the nightstand you have two options. You can either paint it black or use a black stain. Staining is a little more difficult and time consuming and it can be difficult to get the black stain to look exactly how some people like. Black paint will still allow some of the texture of the wood to show through but won't be as pronounced as staining. Painting will provide a more even color.

Staining Black

Sand and clean the entire nightstand. Apply a pre stain wood conditioner followed by 3-4 coats of a black wood stain such as Minwax Ebony Wood Stain. Finally finish with a water based satin polyurethane.

Painting Black

Sand and clean the entire nightstand and brush on a good quality primer such as Kilz Odorless Interior Oil Based Sealer Primer, Zinsser Cover Stain Primer Sealer, or my favorite Zinsser B-I-N Shellac Base Primer & Sealer. After the primer has dried, lightly sand with 220 grit sandpaper.

Follow up with 2 coats of a good black paint such as Benjamin Moore's Aura in satin finish or for a stronger finish Rustoleum Satin Black Protective Enamel Oil Base Paint.
Read More →