
- Getting the dimensions right is 90% of the battle — this guide covers every measurement and formula you need
- Pocket hole joinery + plywood hits the best balance of strength, cost, and simplicity for DIY drawer boxes
- Side-mount slides need 1/2" clearance per side; undermount slides change the math completely — both are covered
- The bottom floats in a dado groove — never glue it in, it needs room to move with the wood
- 9 steps: choose wood, calculate dimensions, cut, dado, assemble sides, install bottom, finish
Get the printable PDF version of this guide — all the formulas, dimensions, and assembly steps in one document you can print and take to the shop.
Get the PDF GuideThere’s a reason this post has been the go-to resource for DIY drawer builders for over a decade — it puts everything you need in one place. When I first tried to learn how to build drawers I had a difficult time finding all the information I needed. A little bit here, a little bit there, but nowhere did I find it all together. After researching the topic and building a lot of drawers myself, I decided to fix that.
Drawer box construction can seem daunting but there are only a few simple measurements you need to get the dimensions right. Using pocket hole joinery, plywood, and the right hardware makes building drawer boxes straightforward — even on your first build. Building these for a new cabinet? Check out my guide on how to build frameless base cabinets first so your opening dimensions are planned before you start cutting drawer parts.

Quick Reference: Drawer Box Specifications
| Feature | Recommendation |
|---|---|
| Side Material | 1/2" or 5/8" Maple Plywood |
| Bottom Material | 1/4" Plywood or Tempered Hardboard |
| Side Clearance (side-mount slides) | 1/2" per side (1" total) |
| Side Clearance (undermount slides) | None — full opening width |
| Dado Width & Depth | 1/4" wide × 1/4" deep, minimum 1/4" from bottom |
| Pocket Hole Screws | 1-1/4" coarse thread for 1/2" stock |
| Joinery | Pocket Hole Screws + Wood Glue |
What You’ll Need
Disclosure: I may earn a commission on affiliate links below, at no extra cost to you.
Materials
Tools
Supplies
- Sandpaper (80 / 120 / 220 grit)
- Minwax Water-Based Polycrylic
- Bar clamps or corner clamps
- Combination square
- Digital caliper — verify actual plywood thickness
Step 1: Drawer Box Construction Overview
Before getting into dimensions, let’s look at how a drawer box is put together. There are many ways to build drawer boxes — some require special tools and skill, others are simple but weak. Pocket hole joinery hits the right balance of strength, appearance, cost, and ease of build. That’s the method this guide covers.

The drawer consists of 6 main components: the drawer box sides, front, and back; the drawer box bottom; the decorative drawer front; and the drawer pull. Two wood screws secure the drawer front to the box; two machine screws hold the pull. Eight pocket holes and screws attach the front and back to the sides. The bottom sits in a dado (groove) cut into all four perimeter pieces — it does not get glued, it floats to allow for wood movement.
Using a separate drawer box and drawer front makes construction easier and gives you much more flexibility when aligning the front on the cabinet after installation. Here’s an exploded view of all the components:

Step 2: Choosing Wood for Your Drawer Box
For the drawer sides, your options in order of best to worst: solid wood boards, veneered hardwood plywood, MDF, melamine-coated particle board. Drawers get abused daily so plywood is the right call — more durable than MDF, less expensive than solid wood. I use PureBond 1/2" Maple Plywood. Maple has a tight closed grain, the light color looks clean inside a cabinet, and PureBond is formaldehyde free.
Side thickness should be at least 1/2". If you can find 5/8" your boxes will be stronger. 3/4" sides are only necessary for very heavy-duty drawers like large file drawers.
For the drawer bottoms, 1/4" plywood is good enough for most drawers. PureBond 1/4" Maple Plywood is the premium choice. 1/4" Tempered Hardboard is about half the cost — dark brown and less attractive, but strong enough for drawer bottoms and easy to find.
Step 3: Drawer Box Width
Two factors determine outside width: the opening width and the slide clearance. I measure the opening after the cabinet carcass is assembled and finished — things don’t always go exactly as planned and plywood thickness varies. I measure at both the front and the back and use the smaller number. With many slides there’s very little tolerance.
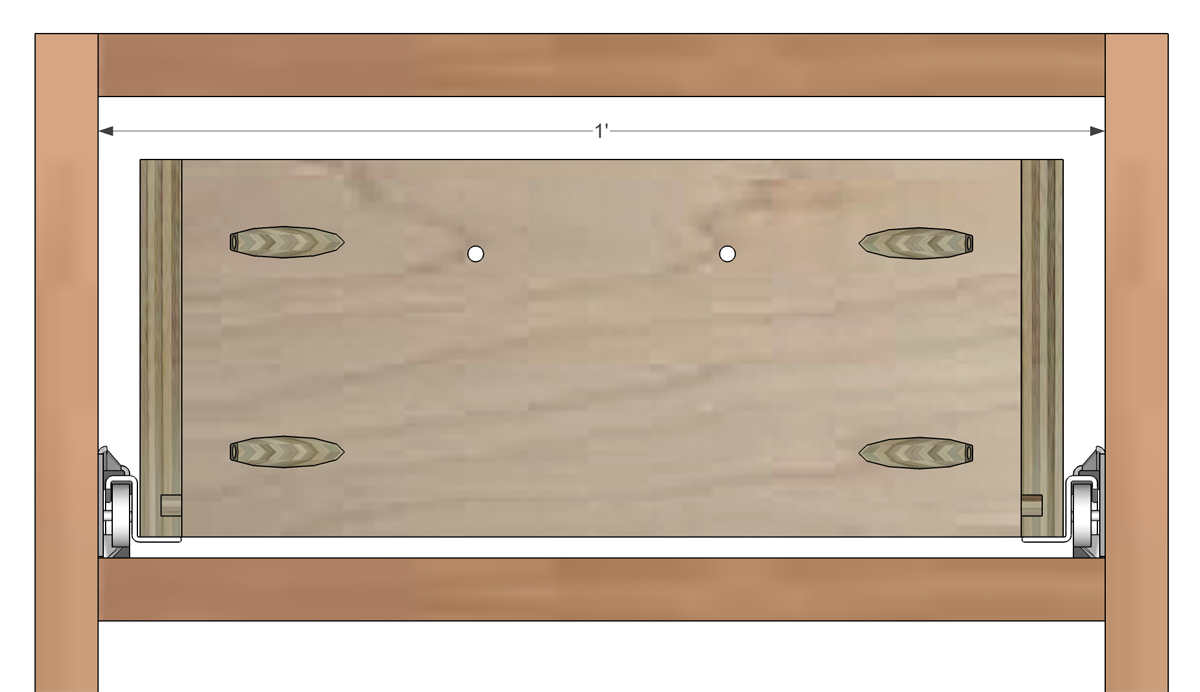
Standard epoxy-coated side-mount slides (like the Blum 230M Epoxy Coated Self-Closing Slides) need 1/2" clearance on each side. Always verify your specific slide requirements before cutting — undermount slides have completely different rules.
Step 4: Drawer Box Height
There are two situations you’ll run into for drawer height.
Constrained Height
When the drawer opening is constrained (a fixed opening between a stretcher and the bottom, for example) measure the actual opening after the carcass is assembled. Measure both sides and use the smaller number.

Non-Constrained Height
In some cases — like the lower portion of a European-style cabinet with no separate drawer opening — the height isn’t fixed by a physical boundary. In this situation your drawer front height is already known, and you simply make the drawer box 1-1/4" shorter than the drawer front.

Step 5: Drawer Box Depth
Depth is driven by the drawer slides you choose. If you’re using Knape & Voigt 22" Full Extension Slides, make your drawer box 22" deep to take full advantage of the extension. First measure the inside depth of the cabinet from the back panel to the front opening.

For overlay drawers — where the drawer front sits in front of the cabinet face — choose a slide 1" to 2" shorter than the cabinet interior depth. Your drawer box depth matches the slide length.

For inset drawers — where the drawer front sits flush with the cabinet face — you need to subtract the drawer front thickness from the available depth. In the example above: 16" cabinet depth − 3/4" drawer front = 15-1/4" available. Choose a slide an inch or two shorter than that and build your box to match.
Step 6: Layout and Cut Your Parts
With your outside dimensions confirmed — in our running example: 11" wide, 15" deep, 4-1/2" tall — you can calculate the individual piece lengths:
I lay out a cut plan before touching the saw to minimize waste. Side grain should run along the length of the piece — the drawer boxes look nicer and are stronger this way. Make your rip cuts first, then trim to length with a miter saw. Leave a few extra inches at the end of each ripped strip in case you need to extend any component.

Cutting the Dado Groove

The drawer bottom fits into a dado (groove) cut into all four perimeter pieces. It does not get glued — it floats to allow for wood movement. Using 1/4" plywood for the bottom means the dado is 1/4" wide and 1/4" deep. Position it at least 1/4" up from the bottom edge; 3/8" or 1/2" up if building a heavier-duty box.
With a Table Saw or Router
Best tools for accurate, repeatable dado cuts. Procedure:
- Rip long strips of plywood to your side height dimension.
- Cut the dadoes with your table saw or router table.
- Trim all pieces to final length with a miter saw at assembly time.
No table saw or router? A Dremel rotary tool with a 1/4" straight routing bit and the Dremel router table works. Make 2–3 shallow passes rather than trying to reach depth in one cut. The bits dull quickly so have a spare.
With Only a Circular Saw

One of the drawer boxes in the photo at the top of this page was built before I owned a table saw — a circular saw with a straight-edge guide produces perfectly accurate results if you take your time. The order of operations is slightly different:
- Mark all cut lines on the plywood, including both edges of the dadoes. Use a different color for dado lines vs. rip lines. Account for blade kerf when spacing multiple rips.
- Set blade depth to exactly 1/4". Test on a scrap piece first.
- Cut all dadoes before ripping the strips — it’s easier to clamp the guide on a full sheet.
- Depending on your blade kerf you may need one or two additional passes to get the dado to 1/4" width.
- Set blade to full depth and rip your strips.
- Trim to final length with a miter saw at assembly.
Step 7: Assemble the Drawer Box Sides
Drill 4 pocket holes on each of the front and back pieces. Drill on the side opposite the dado so you’re not cutting through the groove. For larger drawers space pocket holes no more than 6"–8" apart.

Apply glue to the mating surfaces, clamp, then drive the pocket screws. Check for square immediately — measure diagonally corner to corner in both directions. Equal diagonal measurements means the box is square. Make any adjustment before the glue sets.
Step 8: Cut and Install the Drawer Bottom
With the sides assembled, measure the actual inside dimensions of the box and add 3/8" to each dimension. This gives the bottom room to float in the dado without binding. In our example: inside dimensions are 10" × 14", so cut the bottom to 10-3/8" × 14-3/8".

Unscrew the back pocket screws, slide the bottom into the dadoes on all four sides, then put the back in place. Confirm the box is still square, then screw and glue the back together. The drawer box is now complete.
Step 9: Finishing
Before finishing, ease the sharp top edges of the drawer sides. A router with a small roundover bit is fastest; aggressive sanding works if you don’t have one.
Sand with 80 grit to remove any tool marks, then 120 grit to smooth. Staining drawer boxes is usually unnecessary — the drawer front covers everything. But a clear finish protects the wood, makes it wipe-clean, and helps it hold up against humidity over time.
Two coats is all you need. First coat, let dry (water-based is typically ready in 2 hours), a light 220 grit pass to knock down any raised grain, wipe off the dust, second coat. Done. All that’s left is to install your slides, position and attach the drawer front, and install the pull.
Frequently Asked Questions
What is the best wood for drawer boxes?
Maple plywood (1/2") is the best overall choice — strong, lightweight, smooth finish, and it machines cleanly. Solid wood is beautiful but prone to warping and more expensive. Avoid MDF and particle board entirely; they swell and fail quickly in drawers that see daily use.
How much clearance do I need for drawer slides?
For most standard side-mount slides, exactly 1/2" per side (1" total subtracted from the opening width). Always double-check your specific slide manufacturer’s specs — undermount slides have different requirements and typically need no side clearance at all.
What size screws should I use for drawer box pocket holes?
For 1/2" plywood, use 1-1/4" coarse-thread pocket hole screws. For 3/4" material, step up to 1-1/2" screws. Always pair screws with wood glue — the glue carries most of the long-term load while the screws hold everything tight during assembly.
How deep should a drawer box be?
Match your drawer box depth to the length of your drawer slides. You don’t want the back of the box to hit the cabinet back, so leave an inch or two clearance. For a standard 21" base cabinet, 20" slides and a 20" deep drawer box is a common combination. Planning the cabinet itself first? See my base cabinet build guide for interior depth planning.
How do I calculate the drawer bottom size?
Measure the inside dimensions of the assembled box and add 3/8" to each dimension to allow room in the dado for wood expansion. If your inside dimensions are 10" × 14", cut the bottom to 10-3/8" × 14-3/8". Always measure the actual assembled box — don’t rely on your cut list numbers.
Can I build drawer boxes without a table saw?
Yes — one of the drawer boxes in the photo at the top of this page was built before I owned a table saw. A circular saw with a straight-edge guide can rip plywood strips cleanly and you can cut your dados by setting the blade depth to 1/4" and making multiple passes. It takes more setup but produces perfectly accurate results.
What is the difference between a drawer box and a drawer front?
The drawer box is the structural box that rides on the slides and holds the contents. The drawer front is the decorative face panel attached to the front of the box. Building them separately — as shown in this guide — makes it much easier to align the front perfectly on the cabinet after installation.
Can I use these drawer boxes with undermount slides?
Yes, but you’ll need a few adjustments. Undermount slides like the Blum Tandem series require a notch cut into the back bottom corners of each drawer side where the locking clips engage — typically about 1/2" tall × 1-3/8" wide, though this varies by model. The upside is the slides are completely hidden when the drawer is open. The width calculation also changes: since slides sit under the box rather than beside it, there’s no side clearance to subtract — your box can run the full interior opening width.
How do I keep a drawer box square during assembly?
Measure diagonally corner to corner in both directions — equal measurements mean the box is square. A large flat workbench helps. Clamp before driving screws and check square again right after the first screw while you can still adjust. Dry-fitting without glue first is always worth the extra five minutes.
What is the best finish for drawer boxes?
I always come back to Minwax Water-Based Polycrylic. Dries fast, cleans up with water, and doesn’t outgas the way oil-based finishes do. In an enclosed space like a drawer that really matters — I’ve opened cabinets years later that still smelled like oil finish.
Do I need to sand drawer boxes before finishing?
Yes, but don’t overthink it. Start with 80 grit to knock down tool marks and rough spots, then 120 grit. That’s enough for most boxes — they’re utility pieces, not furniture. For a really smooth interior, do a light 220 grit pass after the first coat once it’s dry, then apply the second coat.
Should I stain my drawer boxes?
Usually not necessary — the drawer front covers everything so staining is mostly wasted effort. That said, if the drawer interior will be visible or you just want a cleaner look inside, go ahead. If you do stain, let it cure fully before applying any topcoat.
How many coats of finish should I apply to a drawer box?
Two coats. First coat, let dry (water-based is typically ready in a couple of hours), light 220 grit pass to knock down any raised grain, wipe the dust off, second coat. I’ve never felt the need for a third coat on a drawer box.
Can I skip finishing my drawer boxes entirely?
You can, but I wouldn’t. Even one coat of polycrylic seals the wood so it wipes clean and holds up better to humidity over time. It’s about 20 minutes of work spread over a day. I’ve built boxes both ways and the finished ones just hold up better long term.
Comments (72)
Join the Discussion (72)