Search Results for: "structured wiring"

Showing results for your search

TBS Structured Wiring Jacket Colors

TBS Structured Wiring Jacket Colors

Color coding your structured wiring can make it easier to install and maintain. It can also help mishaps like having a contractor cut into the wrong wire by mistake. Unfortunately there's no standard for structured wiring jacket colors so let's come up with our own residential structured wiring color guidelines.

Structured Wiring Cable Color Convention

We're going to separate our cabling into 2 types. Premise wiring and patch cords. Premise wiring is the wiring that runs throughout your home, mainly between your central distribution area and jacks. Patch cords are used to make connections between devices in your central distribution area such as connecting a port on your network patch panel to a port on your network switch.

Cat5e cables are really the only cables that give you much of a choice when it comes to jacket colors. You can easily find them in blue, green, purple, orange, yellow, red, grey, white and black. I chose to not use grey, black and white because those are the only colors some other cables come in so I reserved them for that use. I chose not to use yellow and orange for premise wiring because white, yellow and orange are commonly used for electric wiring and I wanted them to be easily distinguished visually. These colors may be used as patch cords however.

I'll go into more details but here's the basic color coding for residential structured wiring.

Here's an example of what a structured wiring panel may look like using this configuration.

Video Wires

The wires you run for your video distribution will generally be coaxial cable (RG6 Quad Shielded preferably) and it really is only easy to find in 2 colors, black and white.

Black

Since every cable and satellite installer I've seen use black cable we're going to designate black coaxial cable as cables that connect you to incoming video signals (A) whether it be from cable, FiOS, satellite or your over-the-air antenna. That will help us identify these input sources both in the wall and at the patch panels.

Black patch cords should be used at the TV if you need to connect one or more devices via coax like a Satellite receiver to a TV.

White

White is one of the colors I really wanted to avoid but with coax there isn't much choice if we wanted to use more than one color. I recommend running the premise wiring (wiring between your distribution center and wall jacks) using white coaxial cable (D) to help differentiate it from the incoming wires. White coax should also be used for patch cords in your distribution panel.

White should also be used for the patch cables (G) that run between wall jacks and devices to help differentiate them from other patch cords that go between devices.

Phone Wires

Gray

Incoming telephone lines (E). We don't usually have a choice what color cable the phone company uses but in my experience they usually use grey so we'll stick with that for the incoming lines.

Green

Green will be used for telephone premise wiring (C) as well as patch cords that connect the phone system together (F) at the distribution panel.

Data Network Wires

Blue

Blue will be used for the premise wiring (B) and patch cables (H) that connect the distribution center to the wall jacks as well as for patching those wires to a network switch. Many installers already use blue for networking which is why I thought it would be a good choice.

Orange

For connecting devices to the network such as servers, wifi access points, routers, etc, I chose orange (I) patch cords.

Making these colors different helps identify these devices on the switch when maintaining them compared to the patch cords that feed the wall plates.

Purple

Purple is used for crossover cables (J). Crossover cables are network cables that are terminated as T568A on one end and T568B on the other. They are used for directly connecting two devices without the need of a switch or hub between them. You'll probably only need them if you have more than switch that you want connected together. Since crossover cables are wired differently it's important that they have a different color so you don't mix them up. 

Even though many switches can auto sense whether a cable is straight-through or crossover and adapt, I still think it's best to use crossover cables to help visually mark these types of connections.

Fiber Optic

Red

If you're running fiber optic cables I would suggest using red to differentiate them from the other cables. Both for premise wiring and patch cords (K). If you're using multiple switches they may have a fiber interconnect.

Wall Jacks

Slightly related is the choice of colors for the ports in your wall plates. For the most part I feel you should stick with a port color that matches the wall plate for aesthetic reasons. The only time you should deviate if you have 2 ports that have the same type of connector that serve different purposes. In those cases you should use different colors to differentiate them.

For example, if you use RJ45 jacks for both phone and network, phone should match the wall plate and network should be blue. You don't want to accidentally plug in your computer's network card in a phone jack because the voltage in the phone line could damage it. If you're using RJ11 jacks for phone and RJ45 for data you can keep them both the same color as the wall plate since you won't be able to accidentally insert a network cable into the phone jack.

If you're running 2 lines of coax (maybe cable and over the air antenna) you may want to choose different colors but I think it's best to just be consistent with always having the left and right ones (or top and bottom) be for specific services on all ports.
Read More →
Deciphering A Structured Wiring System

Deciphering A Structured Wiring System

If you purchase a newer home (or office) that already has structured wiring installed it's important to figure out how it works and where all those wires go. In this article I'll provide some tips to do just that.
I recently received an email from Jon who is trying to make the best use of one of these structured wiring panels but is having a hard time figuring how it's all connected. Jon writes:
Hi Tom,
We recently moved into our home that was built in 2000. It has a patch panel in the mechanical room/closet and we're trying to decipher what's going on here. I've made an album on imgur and described everything and I was hoping you could just let me know if I'm on the right track with my current thinking.
http://imgur.com/a/7Xrxa
Thank-you so much!
Jon
Jon included a lot of pictures of his setup. Unfortunately it's very difficult to figure out what's going on without actually being there. There are some standard ways of doing things for some aspects but not all and some installers will do things their own way, sometimes the wrong way.

I can provide some tips however on how Jon can help figure things out himself with a bit of work. These tips will also help you even if you have a different brand of structured wiring cabinet.

Step 1: Review Labels/Documentation 

If you're lucky someone will have left some sort of documentation. It may be a simple map showing where the wires go or something more complex. Even if it's just a set of labels on the different ports that may be just enough to help you get going.

If you live in a development, you can check with management to see if they have any documentation. If you know the builder you may be able to content them.

Unfortunately for Jon the panel wasn't labeled and even though the individual cables were labeled, it was just a numerical code that he can't decipher.

Step 2: Identify the Manufacturer

In these types of residential systems it's common that all the components are from one manufacturer. Knowing this can help you see what types of standards they have and know what other components you can add in the future.

This is Jon's Structured Media Panel.


It appears to be a Honeywell FutureSmart SuperPro panel. Not sure if these systems are still made as there are a lot of broken links on Honeywell's site in reference to these systems but I did find this Honeywell FutureSmart Brochure that lists various components. I recommend downloading that in case it disappears too.

The top part of these panels deal with wiring that goes to the jacks and the bottom portion is where special modules are used to deal with incoming voice, data and video lines and distribution. 

On the top, each horizontal line of connections is one zone. A zone can be a single room or a single wall plate in that room.

Step 5: Identify Jacket Color Conventions

These panels are wired with coaxial, category (twisted pair) and sometimes fiber cables. The type of cable used helps identify what it's for. Coax for video, fiber and category cable for networking/phone.

Category cable comes in different grades, Cat3, Cat5, Cat5e, Cat6, etc. If you have Cat3 and another such as Cat5, it's likely the Cat3 cables are used for phone. Most installers though will just use the same type of cable (Cat5/5e/6) for both phone and data. In these cases some will have their own color coding conventions to help identify the purpose of the cable. For example blue may be for data and white for voice. Some other cables such as incoming lines may also have different colors.

As I mentioned, there are no standards but many installers do stick with their own conventions. If you can identify what conventions they use, it can help speed things up.

Step 4: Trace Wires Between Panel and Jacks

The first step is to figure out how all the jacks are wired to the patch panel. This is the backbone of the wiring system. Wires will run between the wall jacks and eventually be punched down to the back of the panel. This is more or less 'fixed' wiring. It's just a way to bring the jack connections down to a central location, the panel.

In the SuperPro panel Jon has, all the jacks will be punched down in the back of the top portion of the patch panel. I'm not very familiar with these panels but my understanding is each row of ports is a zone (room) and there are two sides (Interactive A and B) which can be used to distinguish between two wall plates in the room. All the ports on the left will be for Wall plate A and right will be for Wall plate B in each room. Looks like Jon's installation may be following this convention based on the types of ports used on each side.

There are a number of ways to do this but the fastest and easiest way to do this is to pick up a Klein Tools VDV501-809 VDV Scout Pro Tester Kit.


In addition to testing cable, it comes with a number of remotes for RJ45 and F type jacks. You insert these remotes into the jacks upstairs, then you go down to the panel and figure out which ports in the panel map to the jacks that have remotes in them. This is an older model that has only 5 remotes for each type of port. It's a pretty good value. If you want the newer version which also has more remotes check out the Klein Tools VDV501-825 VDV Scout Pro 2 LT Tester and Remote Kit.

In Jon's case, since the wires were labeled at the panel, it's possible they are also labeled behind the jacks. Popping off the wall plate cover and inspecting the wires might reveal labels that make it easy to figure out where those jacks are terminated on the panel. There are two concerns with doing it this way. It's possible the labels fell off or were mislabeled but more importantly it prevents you from buying a new toy. :)

Step 5: Identify Incoming Service Lines

All incoming lines should be terminated in this panel. That's the hole point of having a panel like this. Doesn't look like that's the case for Jon though as the video installers may have terminated their lines somewhere else.

You can use the Klein Scout to help identify these as well but hopefully these are a little more obvious. The Klein Scout has a tone generator and together with the Klein VDV500-060 PROBEplus Tone Tracing Probe you can trace the lines.

In the FutureSmart SmartPro system that Jon is using, the incoming lines should be terminated at the bottom of the panel where the distribution modules are.

Step 6: Identify Patch Cords

At this point we should know where all the jacks come in on the panel and where all the incoming service lines are connected. The way the incoming signals are distributed to the various jacks is by use of patch cords between the top zone ports and the bottom distribution ports. Let's look at the picture of the panel again.


That's the top portion of the panel. It shows the patch cords connected to the ports that lead to the in-room jacks.

And here's the bottom portion of the panel that has the distribution modules.


The patch cords we see here should be the other end of the patch cords in the first photo. Remember, fixed lines are generally punched down in the back and then patch cables are usually used in the front to connect fixed wiring to services.

If you want to send a video signal to zone 1 wall plate B for example you'd add a patch cable between an output jack in the Coax Distribution HUB and the port on the right of the first row of the top of the panel. Same for data and phone using their respective distribution modules.

In this Honeywell system you can connect multiple inputs to distribute them over the same wires as long as those signals don't overlap. For example you can have a CableTV input as well as input from something like an over-the-air TV antenna or the output of a DVD player together. Satellite however doesn't tend to play well on the same cable as other feeds. The Honeywell Coax Distribution HUB Jon is using is also amplified. Signals lose their strength over long runs and many splits so the amplifier boosts the signal to ensure the signal at each port is strong enough.

Next the voice jacks need to be patched into the incoming voice services somehow. This can be done in a number of ways (patch panels, 110 blocks, 66 blocks, etc.) In Jon's case it looks like the module underneath the Coax HUB does just that. Looks like a 4-line telephone distribution module which can distribute up to 4 incoming lines on each cable.

There are also some 2 line distribution modules but it does not appear that they are used.

Finally, the data jacks need to be patched into the network. Unlike video and voice that can just be tied together, networking requires a network switch to deliver the best performance to the network. This is a smart device that routes network traffic to the specific port that the traffic is addressed to.

I haven't seen a networking switch in any of Jon's photos but I assume it must be there somewhere.  Either a Honeywell Switch Module or an external network switch mounted outside the panel. Patch cables will need to be used to connect the jacks (top part of panel) to the ports on the switch. One switch port for each RJ45 jack that you want to enable for data. Also connected to the network switch will need to be the incoming internet connection.

Label and Document Everything

All long the way you should document everything you find. Create maps, Label wires and patch panels. Before you do though, stop and come up with a good naming convention.

In my post on Organizing Cable Clutter I mentioned I use the Brother Easy Handheld Label Maker (PTH100). I chose it because not only can it create labels that you can use for marking patch panels but you can also use it for creating cable flags.


If you're a professional installer there are better choices that really save time and create nicer cable labels but they also cost a lot of money. The Brother costs about $20. You might need to trim some of the labels to get them to fit nicely on patch panels but it's much better than trying to read my chicken scratch.

Summary

While we were looking at a specific brand of structured media panel here, you can use the advice above for most structured wiring installations as they follow similar conventions.

Room Jacks are terminated to the back of a patch panel.

Incoming lines are also terminated in some fashion to a patch panel or a distribution device.

Patch cords are used to connect jacks to incoming services.

Once you break it down to those 3 types of cables it becomes a little easier to understand.
Read More →
Where to Put Structured Wiring Wall Jacks

Where to Put Structured Wiring Wall Jacks

One of the most difficult tasks in planning a structured wiring project for your home is identifying the location to install your wall jacks. You want to find a location that will minimize the use of long patch cords for safety and aesthetic reasons while still allowing you to move furniture around. Here are some of my tips.

How Many Wall Plates Per Room?

Most rooms should have at least one wall plate that can provide at least a phone line and one network line. Larger rooms such as bedrooms, offices, living rooms, etc should have at least 2.

Step 1: Determine Furniture and Traffic Patterns

In some cases furniture will only fit in a room a certain way, a bed will only work in a bedroom on one particular wall for example. In most cases though there's some flexibility.

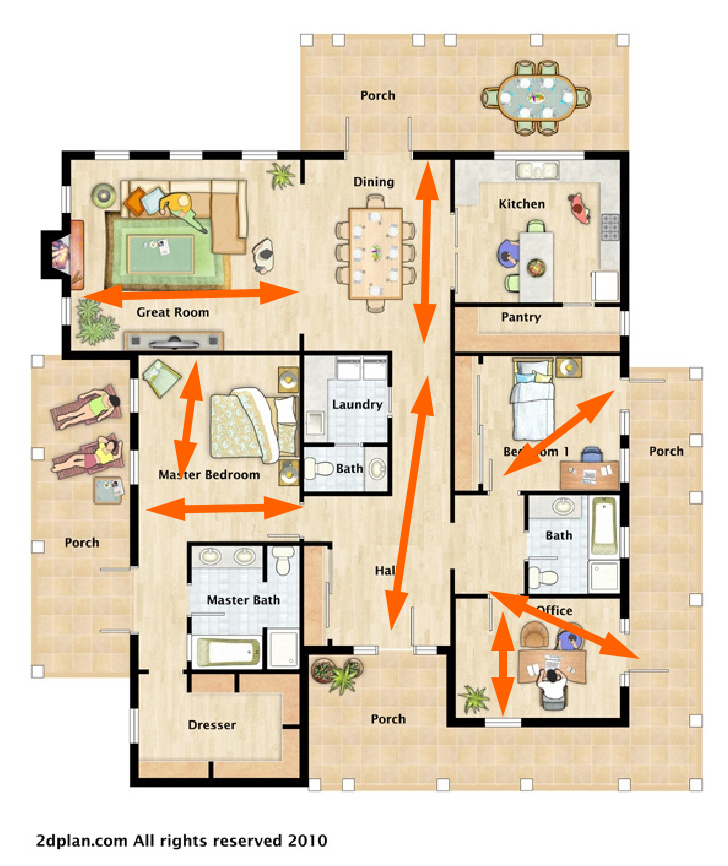
What I find works best is to try to identify traffic flow between fixed elements such as doors and windows. These will restrict the locations where you can place furniture. Sketch out your floor plan and mark the major paths people would flow through the room. For this tutorial I just grabbed a floor plan from 2dplan.com and drew arrows indicating the major flows of traffic through the rooms.


Notice how the traffic patterns split the rooms in 2 or 3 sections. Furniture will need to be laid out in a way that doesn't restrict the flow of traffic. The most convenient location for the jacks will be near certain furniture. Since the traffic patterns help guide furniture placement we can also use them to place wall jacks.

In the Master Bedroom for example we have 2 main flows. From the entrance to the window wall and from the window wall to the bath/dresser/porch doors.There are really only 2 ways the bed can be placed in that room. Either on the left wall as shown, or on the top wall. (Okay, 3 if you count in the corner between those two walls but I'm not a big fan of beds in corners.)

Step 2: Put a Wall Plate In Each Traffic Zone

The paths of traffic split up the room into different zones. In Bedroom 1 for example, there's one main traffic path from the entrance door to the patio door that splits the room in half diagonally. The bed is in the top half and the desk is in the lower half but it could easily be set up the other way around.

If we place one wall place on the top wall and one wall plate on the bottom wall we can easily hook up a phone on a nightstand next to the bed, a computer on the desk or a TV opposite the bed in all reasonable furniture placements without having to run wires across the flow of traffic (trip hazard) or without having to run long, unsightly patch cables.

Also consider most rooms will have a sitting/sleeping location, a viewing location (location of TV). The traffic patterns will normally split things up into workable sitting and viewing locations but make sure you can accommodate different sitting/tv locations with your wall plate locations.

Here is how I would run structured wiring and install wall plates in the sample floor plan to get the most functionality and versatility. Each orange dot represents where a wall plate would be installed.


Read More →
Old Home Phone Wiring: Organize Messy Jacks With a Bridged Telephone Module

Old Home Phone Wiring: Organize Messy Jacks With a Bridged Telephone Module

Messy old home phone wiring in a basement before the jacks and cables were organized
Old home phone wiring can turn into a confusing mess once extra jacks and splices get added over the years.

If you're dealing with old home phone wiring, messy phone jacks, or a basement full of mystery cables, you're not alone. A lot of older houses started with one or two phone jacks, then had more added wherever they were needed. The quick fix was often to tap into the nearest jack or splice into an existing run, which works until you need to trace a line or fix a bad connection.

That's what I ran into on a family member's house. We weren't building a big multi-line phone system from scratch. We just wanted to clean up the old house phone wiring, figure out which cable went to which jack, and make the connections more reliable without tearing open walls.

Read More →
Residential Keystone Wall Plate Configurations

Residential Keystone Wall Plate Configurations

It's important to run enough cables and provide enough jacks in your home to not only provide the services and equipment you currently use but also to account for any future needs including rearranging furniture. In this post I'll go over what I think are the best practices regarding which keystone ports to include in your wall plates.

ANSI/TIA-570-C Residential Structured Wiring Standard

There's actually a standards document that was last updated in 2012 for residential structured wiring, ANSI/TIA-570-C. It provides the minimum outlets to meet 2 different grades of the standard. Each of the grades indicates you should have at least one wall plate in each kitchen, bedroom, family/living/great room, and den/study/office of your home. See my recommendations on where to put voice/data/video outlets in each room of your home.


For ANSI/TIA-570-C Grade 1 you should have at least one 4 pair UTP (Cat5e minimum) and one RG6 cable terminated in each wall plate.

For ANSI/TIA-570-C Grade 2 you need at least 2 4 pair UTP (Cat5e minimum) and 2 RG6 cables at each outlet with 2 optional fiber cables.

According to the standard all residential 4 UTP cables should be terminated according to the T568A standard.  Which I think makes the most sense. There's a misconception that T568B is newer or better, but it's not. The only difference between the two is that the green pair and orange pair are swapped. T568A is more compatible with phone systems so you can use an RJ45 jack for phone or ethernet depending how you have it terminated on the other end.

My Disagreements with TIA-570-C

The ANSI/TIA-570-C standard is a long document covering many concerns with residential wiring, most of which I agree with and I think make a lot of sense. There are a couple of things I don't agree with.

RJ12 Phone Jacks Not Allowed

This is a poor decision in my opinion. All residential phones use 6p4c jacks. While you can get a 6p4c plug into an RJ-45 jack it's not ideal. The ports should be designed to work with the  intended equipment.

I know landlines aren't a priority for most people these days but I don't agree. In the event of an emergency, the more communications options you have the better. I live in an area where most phone, cable and power lines are above ground on poles. It's not uncommon to lose power or phone service for brief periods of time. Over the past few years there have been some major events in my area. I'm only a few miles away from the site of the World Trade Center. On 9/11 you had a hard time making a cell phone call. During Superstorm Sandy a lot of people had their landline and/or power. Again, cell phone service, even wireless data was very unreliable for those that were able to keep their cell phones charged since even gas was hard to come by due to generator usage and no power at many pumps. If you're already running cables, it's not a big deal to run phone lines too and you can get

I think having a landline with at least one corded phone on each floor is important to have. Even if you don't use it frequently it's good to have for emergencies. You can strip off all the calling features and get the minimum per minute rate with free local calling in most areas for around $15 or less. You might have to spend some time on the phone with your provider but it's worth it. Get rid of all the extras like wire maintenance too. If you're reading this document and doing your own cabling you can manage to fix your phone wires yourself and save over $100 a year.

According to the spec, all Cat5e cables should be terminated at outlets using 8p8c (RJ-45) ports. You also can't split the wiring behind the outlet. That means if you run Cat5e for your phone, have 4 phone lines, one for lines 1&2, the other for lines 3&4, you can't have 2 Cat5e ports wired to 1 cable, which would be the cleanest way to work with most phones. Instead you'd have to wire the 4 line cable to a Cat5e jack then use a break out cable to split the lines externally. I have instructions on how to make a RJ45 to telephone jack breakout cable.

I don't like this at all. My recommendation. Include at least one RJ-11 6p4c Keystone ports on each wall plate. Run Cat5e even though Cat3 is more than fine for standard telephone lines. You can always change out the ports later, just make sure you allow some extra cable at the wall plate and patch panel to allow you to terminate a new connector. You'll only need to punch down the blue and orange pairs. If you have 3 or more lines (or just want 2 phone ports that you can connect to line 1 at the patch panel) punch down the green and brown pairs on a second RJ-11 keystone. See the post on the breakout cable I mentioned previously for more info. As long as you keep each pair twisted as close to the punch down terminal as possible and keep each pair of pairs twisted as much as possible there shouldn't be much risk of noise in the line.

Doing so is cleaner, neater and it helps you differentiate phone and network ports easily. While you can plug a phone plug into a RJ-45 jack, it can sometimes damage the pins. If you do that you'll also best to color code network and phone ports which I don't like. Even though I wound up ordering different colors (blue) for my network Cat5e ports I'm starting to think it looks a bit tacky and too much like an office, which I don't want in my home.

Don't even consider Fiber

I know TIA only mentions fiber optic cable as an optional feature but I don't think you should even consider it. Everything about fiber (the cable, the networking equipment the tools you'll need) is much more expensive.

Properly terminated and run Cat5e should handle 10GB/s speeds on cable lengths less than 140 ft that don't have much alien cross talk between cables which shouldn't be an issue for most residential installations. If 10GB/s speed is important to you look into Cat6a or preferably Cat7. 

Even if you only get 1 Gigabit per second speeds that should handle most residential needs, including streaming large HD video. Over the air ATSC broadcasts are less than 19.28 Mb/s per channel and the maximum blu-ray transmission rate is about 50 Mb/s. On a 1000Base-T network you can stream 50 TV channels or 20 Blu-Ray movies at the same time. Probably not something you'll be doing at home.

With some broadcast quality HD cameras you can record video at an uncompressed 1.5 gigabits per second but there's no reasonable way to play those at home right now. If you do manage 10Gb speeds you can still stream six of those movies. By the time you'll need the speeds of current fiber, current fiber technology will be cheaper and they'll be something way better.

My Wall Plate Configuration Suggestions

As I discussed in my recommended locations for voice/data/video wall plates you should strive for at least 2 outlets in each room and at least one in the dining room since most people use their dining rooms for other purposes these days.

More details in the other article but basically in each room you have at least two areas where you'll need connectivity. In a family room you'll have the area where you'll put your TV and other video equipment where you'll need RG6 and networking cables (maybe even phone) and you'll have your sitting area where it's nice to have phone and networking. In a bedroom you may have a bed, desk and TV where it's nice to have connectivity but you can serve 2 of those areas from one wall plate.

Wall Plate Labeling and Port Numbering

A quick aside before we get to the wall plate configurations. I think labeling wall plates and using colored keystone ports looks tacky and too much like an office for my tastes so wall plates won't be labeled and all keystones colors will match the wall plate except in rare instances like if you need to easily identify a PoE (power over ethernet) port to avoid damaging equipment. In a future article I'll show you how I'm mapping out my own installation so you can see how easy it is to manage without labels on the wall plates. 

Since there may be more than 1 type of cable present, all cables will be numbered from left to right and top down. So let's say you have a 6 hole wall plate with 2 coax on top and 4 RJ-45 network ports. The two RG6 cables will be video 1 on the left and video 2 on the right and the 4 RJ-45's will be data 1 and data 2 from left to right on the middle row and data 3 and data 4 from left to right on the row under that.

No need to label the cables V, D, P or anything like that for video, data and phone, the different types of connectors and cable colors (see my residential cable jacket color recommendations) will take care of identifying the purpose of the cable.

Bare Minimum


At the very least, every room should have 1 RG6 port, 1 RJ-45 network port and 1 phone port. 

There should be at least 2 wall plates in most rooms. One on either side of the main traffic pattern of the room or other obstacles. 

Each wall plate should have at least 1 ethernet port except where you're wiring a location for a wall mount phone. For example, if you plan to keep things down to cut costs and you're installing 2 wall plates in the bedrooms, one for phone near the bed, one for RG6 on the opposite wall for a TV, also run a Cat5e for networking to each wall plate even if you currently don't plan to use a wired laptop in bed, desk or you don't have any TV equipment that's currently networked. Chances are you'll want to have as many options for networked devices as possible.

I have a very good WiFi setup but I always prefer to have a wired networking connection. Wired will always be faster and as more neighbors get WiFi mine gets occasional hiccups.

Dual VDV Wall Plate


In an ideal world, if money and number of holes you can drill was not an issue, you would run at least 5 cables to each and every wall plate. This will give you the most freedom to rearrange your furniture and equipment without having to alter any of the structured wiring.

This is also the most versatile solution for new construction where you or the builder may not know how the furniture will be arranged.

Two RG6 cables. One can be used for a paid TV service and the other can be used for rooftop over-the-air antenna or you can just have two feeds, one for a TV, one for a media center. You can also just use one as a feed and the other to send an RF signal back to the distribution panel then back out to another outlet if you want to do something like share the output of one cable set-top box with another television set.

Two RJ-45 ports to connect to your home's ethernet network. Two is ideal but you may need more than 2 in some locations. For example in a family room with an internet connected TV, Blu-Ray player and a couple of gaming systems 4 ethernet jacks would be ideal near the TV.

Two 6p4c phone jacks. If you have more than one phone line (including VOIP lines) you can split them up between the ports so you have lines 1&2 on the left and lines 3&4 on the right, or if you only have one phone line you can send the line up twice, once to each jack, by connecting the blue pair and the green pair to your line 1 dialtone bridge. See my post on how to wire a 110 block for more information.

You may want to run 2 separate Cat5e cables, one for each jack even though you may only be using 1 or 2 pairs from each. It's nice to have an extra cable in the wall if your phones are important to you. Sometimes a cable or even just a pair can get damaged. I stuck to 1 because even I realize landlines aren't as important. 

One Dual VDV and One Dual DV

We don't live in an ideal world and money, time and how many cables we can run is limited. If you've lived in your home a while and aren't the type of family that constantly rearranges furniture drastically, you may omit the RG6 cables from any wall plate that you don't currently have or want the option to install a TV.

In your family room for example you'll have two walls plates (as in most rooms). The one closest to the TV will be the Dual Video, Data and Voice configuration while the one near your seating area will just be dual data and voice. You can even omit the phone cable by the TV if you want or run a third network cable.

This is the setup I'm going with. RG-6 cable is the most problematic to run. It has a larger diameter so you can't run that many through holes or conduit. (See my post on how many cables you can fit through a hole.) It's also thicker and harder to pull and more expensive to run and terminate. I do plan on leaving a bit of slack looped up in the wall, attic or unfinished parts of the basement so that if there's ever a need to move the TV to the other side of the room moving the RG6 cables from one wall plate to the other will be easier.
Read More →
RJ11 Phone to RJ45 Jack

RJ11 Phone to RJ45 Jack

Cat5, Cat5e, Cat6 cable is frequently used for wiring telephone jacks. You can send up to 4 telephone lines on one 4 pair cable that terminates at a RJ45 (8P8C) jack. The problem is most phones, even multi-line phones, don't directly plug into an RJ45 jack. We'll discuss some options for connecting phones with RJ11 connectors to an RJ45 port.

Jack Configuration

Before we get into separating the phone lines, lets understand what's going on in the jack. Nobody uses the old quad (green, red, black, yellow) phone cable anymore in new wiring. It's mainly Cat3 or better cable which consists of 4 twisted pairs of wire in blue, orange, green and brown along with their white wire that has a colored stripe (white-blue, white-orange, white-green, white-brown). Since a standard telephone only needs one pair of wires per line, we can send up to 4 lines on each cable. This offers a lot of flexibility and saves time and labor running phone cables in a multi-line system. Even if you're only going to be running a single phone line, you have room for expansion.

For consistency, the ability to utilize all 4 lines and to save space in the wall jack, phone installations are typically terminated in an 8P8C (8 pin 8 conductor) jack. This is the same jack used for your ethernet cable. This is a bigger jack than you might normally expect for a phone which is typically a smaller 6P6C or similar (RJ11, RJ12, etc). 6P6C supports up to 3 lines, 6P4C 2 lines and 6P2C is a single line jack but they all use the same plug. Only difference is the number of wires in the cable.

There are three standard ways of wiring a phone jack. T568A, T568B and USOC. The difference is what colors are connected to what pins on the jack.


T568A is the preferred method for wiring telephone and ethernet jacks and the only method suggested in the residential TIA-570-B specification. Somehow T568B became popular in U.S. commercial installations but T568A is used more outside the U.S. and the Federal Government specifies T568A for their installations. To all the naysayers... See sometimes the government can do things better than the private sector. :) USOC isn't commonly used anymore but is the type of wiring scheme telephones use. 

It would make sense to wire ports following the USOC specification but by using T568A a cable can later be easily switched from voice to data or vice versa in the future. You'll notice that Line 1 and Line 2 on both T568A and USOC are identical. If you have a two line phone, you can plug it directly into a T568A wired jack and both lines will work. The smaller RJ11/12 plugs will fit directly inside an RJ45 jack. It's not preferred since you might damage the other pins but it is designed to work that way.

Unless you need to match a currently installed pinout plan, try to always use T568A. Either way, it's important to know how your jacks are actually wired.

Telephone Jack

Compare the above jacks with old style 2-line phone jacks that used to be used on walls and are still used in phones. They look like this.

The above is a standard 6P4C telephone jack that supports 2 phone lines. Line 1 is on the center pins line 2 is on the next set of outer pins. If twisted pair wiring is used the colors would be white-blue for green, blue for red, white-orange for black and orange for yellow.

If you hook up a single line phone it will only make a connection with pins 2 and 3 (line 1). With a two line phone you'll use all 4 pins.

Connecting Standard 4-Line Phone to RJ45 Jack

The Jack supports 4 lines, the phone supports 4 lines this should be easy right? Nope, not usually. The problem is that most standard 4-line phones don't have a single 4 line RJ45 jack, instead they usually have 2 6P4C (RJ11) jacks that support 2 lines each.

There are a few ways to handle this correctly but let's first talk about how not to do it. You may think that it would make life easy if you just split the pairs of cables behind the wall plate and use 2 RJ11 keystone jacks. This will theoretically work and considering it's just phone there will be minimal issues with interference having a bunch of exposed pairs but it can lead to problems. You will obviously increase the chances of having interference, the wires will be easier to damage, you're going to be taking up extra space in the wall plate and you lose the ability to easily change that port to a network port in the future. It's also prohibited in the spec.

RJ45 4-line to 2 RJ11 2-Line Adapter

There are a number of different splitters (usually named 400E) like this Suttle 400E Cat5 Splitter that plug into the RJ45 Jack and have 2 RJ11 jacks each with 2 lines. These are fairly easy to find but just make sure you're not getting a regular telephone splitter (1 RJ11 to 2 RJ11). It needs to have a male RJ45 on one side and 2 female RJ11's on the other.


Taking a close look at the wiring diagram it appears to follow T568B on the RJ45 side. You can still use it with T568A pinouts but line 2 and 3 will be swapped. If your phone jacks pinouts follow USOC this adapter won't work.

Break Out Cable

If you can't find the splitter above, you can make a breakout cable from twisted pair cable.

On one end you'll crimp an RJ45 jack following the pinout used in your wall jack. On the other you'll crimp 1 or more RJ11 jacks. If you just want to pull one line out for a single phone, pick the pair of wires for the line you want and insert them in the center pins of the RJ11. You can also do 2 2-line RJ11 plugs, 4 1-line RJ11 plugs, whatever works for you.

Break Out Box

Manufacturers of structured wiring systems also have premade break out boxes that will allow you to access the 4 lines in different ways. The Leviton 47609-4x4 4x4 Breakout Module is one example.

 
Since the Leviton systems are geared towards residential installations the Leviton 47609-4x4 is wired according to the T568A pinout unlike the splitter above which is T568B.

DIY RJ45 to RJ11 Break Out Box

If you can't find the break out box above or have special needs you can make your own break out box.

You can make one anyway you'd like but to give you an example let's make a a 4 port box that takes an incoming cable and splits it up to L1&2, L2&1, L3&4, L4&3 similar to the Leviton.

We'll need:
For tools we'll need:
  • Punch down tool with 110 cutting and non cutting blade
  • Modular Plug crimper
  • Screwdriver
We're going to daisy chain 2 pairs on 2 ports for Lines 1 & 2 and then do the same on 2 other ports for lines 3 &4 so we'll have 4 jacks wired like this:


With this configuration we can connect:
  • 4 separate 1-line phones to one RJ45 jack to access all 4 lines.
  • 4 2-line phones 
  • 2 2-line phones
  • or some other variations like one 4-line phone a fax machine and a single line phone.
It's snowing and I don't have any phone jacks handy so I'll be wiring it up using standard 8 wire Cat5e jacks. Same principle but I'm punching down the wires on different pins than I mention in the instructions.

Step 1: Strip cable

Strip the outer jacket of the cable fairly long (maybe 8-10") so you have plenty of wire to work with.


Step 2: L2&1 Jack

We're going to start with one of the center jacks (Lines 2 & 1) and work our way out on either side.  Untwist the orange pair of wires near the base (don't untwist the pair completely) and punch them down to pins 3 & 4 (orange and white-orange) using a non-cutting 110 blade. I'm using the plastic punch down tool that comes with the jacks. Repeat for the blue pair on pins 2 and 5 (white-blue and blue).


Step 3: L1&2 Jack

Next we'll do the Lines 1 & 2 Jack using the same blue and orange pairs except we'll punch them down on the opposite pins as before. 3 and 4 for blue and 2 and 5 for orange. This time when we punch down the wires we'll use the cutting 110 blade to trim off any excess wire.

Have a look at the jack and visualize how you want it to appear in the surface mount box. For me, I'm going to want to punch down the next jack to the right of the first one. Your jacks may be different so stop and check. Remember the pins will be on the top when mounted in the box.

Also, position the next jack far enough away so you have ample wires to position the jacks in the ports on the surface mount box. 


Step 4: L3&4 Jack

Now on the other side of the L2&1 jack we're going to add a jack for Lines 3&4 using the green and brown pairs on pins 3&4 and 2&5 respectively as shown in the previous diagram. 

Use the non-cutting blade and leave enough wire to be able to position the jack in the surface mount box.


Step 5: L4&3 Jack

The last jack is the lines 4 and 3 jack. We'll punch the green pair to pins 2&5 and the brown pair to pins 3&4 using the cutting 110 punch down blade.

Step 6: Insert Jacks In Surface Mount Box

Put the dust covers on the jacks if supplied then install the jacks into the ports on the surface mount box. Mark the surface mount box above the jack so you know it's function (L1&2, L2&1, L3&4, L4&3 or whichever configuration you chose.)

Step 7: Crimp RJ45 Connector

On the other end of the of the wire crimp on an RJ45 connector using the appropriate pinout for your wall jack. Either T568A, T568B or USOC.
Read More →
How To Wire RJ45 Patch Panels For Home Phone Lines

How To Wire RJ45 Patch Panels For Home Phone Lines

You can create flexible, multi-line telephone wiring using Cat5 or Cat6 RJ45 patch panels. Here's some tips on how to wire RJ45 patch panels for telephone wiring.

Home networks are becoming more important and many people are adding structured wiring for high speed data lines in their existing homes or new construction to be able to transport large files such as video and backups quickly. While adding these new data lines it's a good time to rewire your outdated home telephone wiring too!

It's common to use a 66 block or 110 block for analog phone lines but it seemed a bit complicated to do what I wanted. You can create a simple switch board to help you manage multiple analog phone lines using the same RJ45 patch panels you're using for your Cat6 data lines.

You can have multiple lines per room and easily change which lines go to which rooms. You can have as many or as few incoming phone lines as you need but for this tutorial I'm going to assume there are 4 incoming phone lines. Let's say one main house voice line, 1 line for a home office plus 1 fax line and another line for an older kid's room.

I spent half this past weekend trying to find info on how to do what I wanted without much luck. After I figured out how best to wire telephones using Cat6 patch panels I decided to post it here so I don't forget and incase anyone else finds it useful.

If you don't have a need to regularly switch around your phone lines have a look at my posts on how to wire a 66 block and how to wire a residential 110 block. If you want something very simple use a Leviton Phone Distribution Panel which was very quick and easy to install.
Read More →
How to Wire A 110 Block Telephone Connector

How to Wire A 110 Block Telephone Connector

110 wiring blocks are commonly used for distributing telephone lines in homes and offices. If your home was built after 1990 there's a good chance you have a 110 block connecting your telephone jacks to your incoming phone lines. They're a bit complicated but knowing how they work can wind up saving you a lot of money. In this post we'll go over over the different parts of a 110 block and how to wire your phone system.
Read More →
How to Wire a 4 Line Bridge with a 66 Block

How to Wire a 4 Line Bridge with a 66 Block


Instructions on how to wire a 66 block with as a 4 line bridge for 11 telephone ports. This is a common way to wire residential and small business telephone wires.

There are a number of different ways to wire your phones using a 66 block. I discussed another option in my article on How to Wire a 66 Block. That was a little more complex but it's worth reading if you're not familiar with 66 blocks and would like a better understanding of how they work and what you can do with them. That other wiring provided less density but gave you greater flexibility.

This article will show you to use the inner pins to create a daisy chained bridge for up to 4 incoming lines going to up to 11 phone ports. It's still a bit complicated so if you want something easier look at the pre-made 1x9 bridge in my article on organizing telephone lines in an older home for an easier solution. We're essentially using a 66 block to make a 1x11 bridge. You can always buy 2 1x9 bridges and wire them together saving a lot of time but if you want to understand 66 blocks better or, like me, just enjoy using your punch down tool keep reading.

What you'll Need

Materials

  • A 50 pair split 66-block 
  • A couple of screws to attach the mounting bracket to your structured media panel
  • Cat5e cable running to your phone jacks as well as an incoming phone line
  • Some spare Cat5e you strip to separate individual pairs

 Tools

  • Screwdriver for screwing down mounting bracket
  • Punchdown tool with 66 black (cut and non-cut)
  • Spudger
  • Wire snips


Above are the tools I use. I have a Klein Tools VDV427-822 Comfort Grip Impact Punch down tool kit which I think is the best punch down tool out there because it has a long reach and is shaped like a screwdriver. It comes with the spudger which is a tool used for moving and pulling small wires in tight to reach areas. And I have a pair of 5" Wiss electrician snips for cutting and stripping wires. You'll also need a 66 blade that has a cutting and non-cutting side like the Klein VDV427-016-SEN  66 blade.

The kit comes with a nice case that clips everything I need on my belt even has a pouch for extra blades.

Step 1: Mount 66 Block To Structured Media Panel Feed Cables


Remove the 66 block from the 89d mounting bracket and secure the bracket to your structured media panel or other appropriate surface and start to feed your cables up from the bottom leaving a bit of a loop in case you need extra wire to punch the wires down again in the future.

There are 12 cables total. 1 Grey Cat5e for the incoming lines and 11 green Cat5e cables for the premise wiring that goes to the phone jacks. You can use any colors but for consistency I follow my Structured Wiring Jack Color recommendations. Feed 6 cables through each side of the mounting bracket making sure the grey incoming cable is on the upper left of the bracket.

Clip the 66 block back on the mounting bracket.

Step 2: Punch down Incoming Cable

I like to start out by punching down the premise cables first since in a residential installation they're typically not going to change.

I start by punching down the grey Cat5e cable that has 4 pairs for up to 4 incoming lines. I punch it down to the upper left of the block which is where incoming lines are typically placed.

I'm using a Cat5e rated 66 block and Cat5e cables even though analog phone lines don't really need to be installed with that spec. Because of that I'm wiring the 66 block slightly different to maintain the twists in the wire pairs as much as possible.

Instead of stripping the cable all the way back I'm stripping it so that it lands around the center of the area of where it will be punched down and instead of untwisting the wires and feeding each one through it's own fin, each pair goes through one fin and there's an empty fin below it.


The wires get punched down to the pins closest to the fins. I hook the white striped wire of the pair up to the pin above and the colored wire down to the pin below. This way the twists are preserved as much as possible. I use the terminate and cut side of my 66 blade in my punchdown tool to punchdown and trim away the excess cable.

Important: Make sure the cut side is up for the white striped wire and down for the colored wire when punching down.

The order of wires is white-blue, blue, white orange, orange, white green, green, white brown brown.  It's easier for me to just remember blue, orange, green brown and the white striped wire goes on top.


Step 3: Punch down Premise Cables

The green cables lead to phone jacks installed in various rooms throughout the house and will be terminated in the 66 block.

First we strip the cable. I take my snips and score the jacket a couple of inches down from the end then bend to crack and remove the outer jacket. Grab hold of the rip cord and start ripping down the outer jacket until it comes to just under the fins. I hold the cable down around 4 fins from where the first wire is going to be punched down so it lands around the middle. I trim off some of the excess wire at the end as well as the jacket and rip cord.


Now separate the pairs in the order they will be punched down, blue, orange green brown and feed them through the appropriate fins.


Untwist the blue pair just enough so you can hook the white-blue wire to the pin on top and the blue wire to the pin below.


Then punch down the wires making sure the punch down tool is cutting on the top for the white blue wire and on the bottom for the blue wire. I use my finger to hold the jacket of the cable down to the side of the block so it stays in the middle. This isn't that important but I think it looks nicer when it's centered.


Repeat for the other 3 pairs, orange, green and brown.


Now just repeat that process for the rest of the premise cables and your 66 block should now look like this.


Keep in mind that the 66 block has 50 rows of pins but we're only punching down 6 cables which is 24 pairs or 48 individual wires so there will be two empty rows on the bottom.

Step 4: Cross Connect Daisy Chains

We have the incoming lines and all our premise wiring punched down on the 66 block but they're not connected to each other yet so none of the phones will have dial tone.

To get the phone lines connected to the incoming phone lines we're going to daisy chain some wires on the inner pins to feed dial tone from each incoming line to each phone jack.

I cut a length of Cat5e cable, remove the jacket and separate out the 4 pairs of wires to create the cross connects. That way each cross connect daisy chain is color coded to match the colors on the incoming line pairs.


We start with the blue pair, line 1 and punch down the white blue wire to the pin next to the incoming white-blue wire and the blue wire next to the incoming blue wire. Feed the cross connect wire through the same fins that the incoming blue pair is in.


The blue pair cross connect now has dial tone for line 1. We'll use the cross connect wire to provide dial town to the other extensions. Here you can pick and choose which lines to send line 1 to. You can send it to only a few of the extensions, you can choose to send it to a different line (color pair) instead of blue, etc. For simplicity and because it's the most common way of doing things in a home installation we're going to send line 1 to all the line 1's (blue pairs) of the premise wires and do the same for the other 3 lines as well.

Now run the cross connect wire down to where the blue pair is on the next premise cable and start to separate the twists without cutting the cross connect wire. It sometimes helps to use the spudger to create an opening in the twists.


Punch down the wires using the non-cutting side of the 66 blade. We don't want to cut the wire because that will break the connection and lose dial tone we need to send to the other cables.

When you're done punching down the wires feed it back out through the same fins the wire came in through and continue to the next cable's blue pair.


Wrap around the bottom of the 66 block and continue up the other side until you get to the end. When you get to the end use the cut side of the 65 blade to punch down and cut the cross connect wires. Your 66 block should now look like this.


Side Note: We don't have to do both sides of the 66 block with the cross connect wire. We could just do one side and use cross connects to send dial tone to the other side but I think it looks more consistent to use the cross connect wire and I enjoy punching things down. :)

Now repeat the above with the orange cross connect wire to send line 2's dial tone to all the premise wires.


Most homes these days probably only have 1 phone line (if that) but it's nice to have one extra line setup and ready to go if necessary. Back in the day you'd have the main house line, maybe a line for a modem, then the kids would want a line to talk to their friends but now most people have broadband and you're more likely to get your kids a cell phone than a landline. Most people can probably stop right here but we have the other cross connects ready and it's fun to punch wires down so we'll feed line 3 (green pair) and line 4 (brown pair) to all the lines too and our 66 block will end up looking like this.


And here's one more shot showing a bit of the side.


So that's how you make a 4 line 1x11 bridge with a 66 block. You can use the techniques to customize the wiring to suit your needs now or in the future. If this seems too difficult for you there's always the Leviton 1x9 Telephone Bridge that already has the bridge part done for you, all you have to do is punch down your incoming and premise wiring. No need to punch down all those cross connects but the 66 block locks cooler and did I mention I like punching things down? :)
Read More →